UAE
UAE  INDIA
INDIA  USA
USA  OMAN
OMAN 

Home | Articles| Zoho Mail
A Step-by-Step Guide to Set up Zoho Mail for Your Business
In this article, we will guide you through setting up a business email account with the Zoho Mail solution.
Steps to Signing up for Zoho Mail
1. Visit the Zoho Mail Homepage
Go to the official Zoho Mail website. Then click Sign up for Free after entering the required details. This will direct you to the page where you can discover and select Zoho Mail plans.

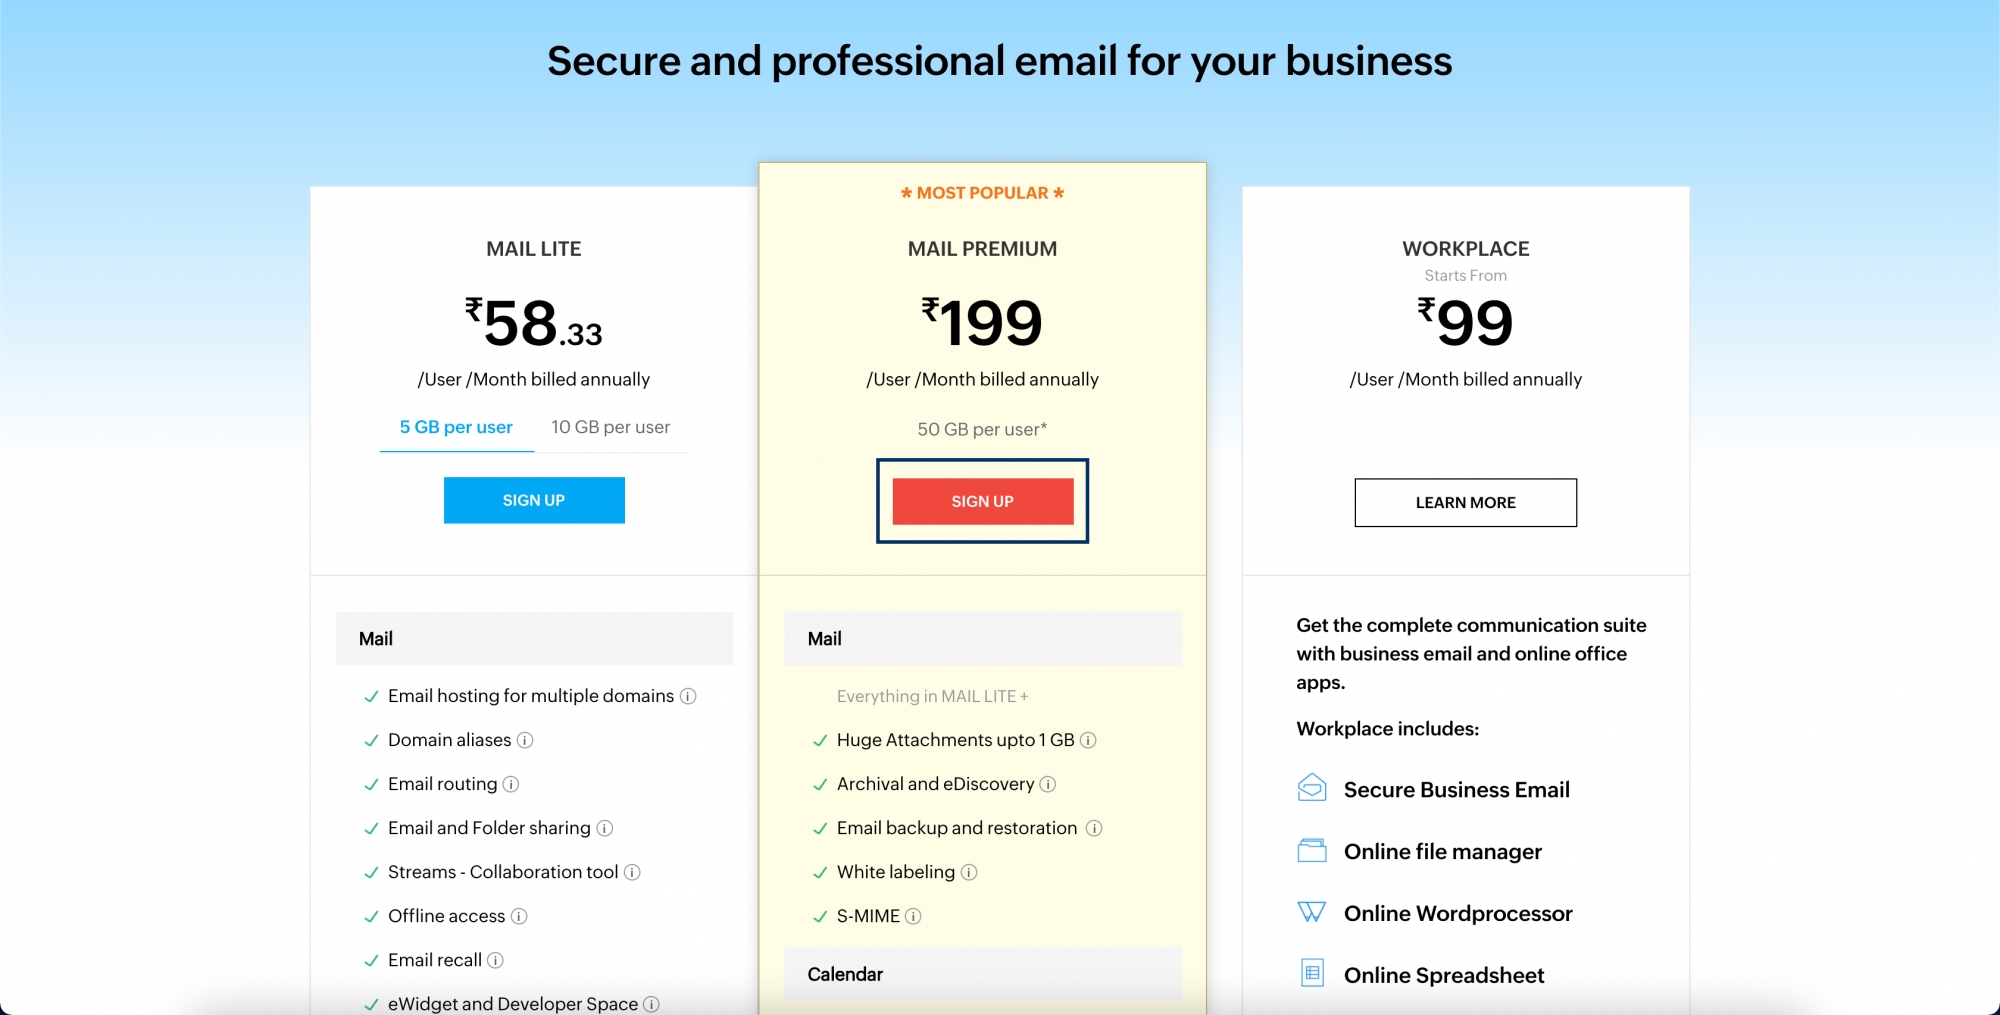
2. Select your preferred plans
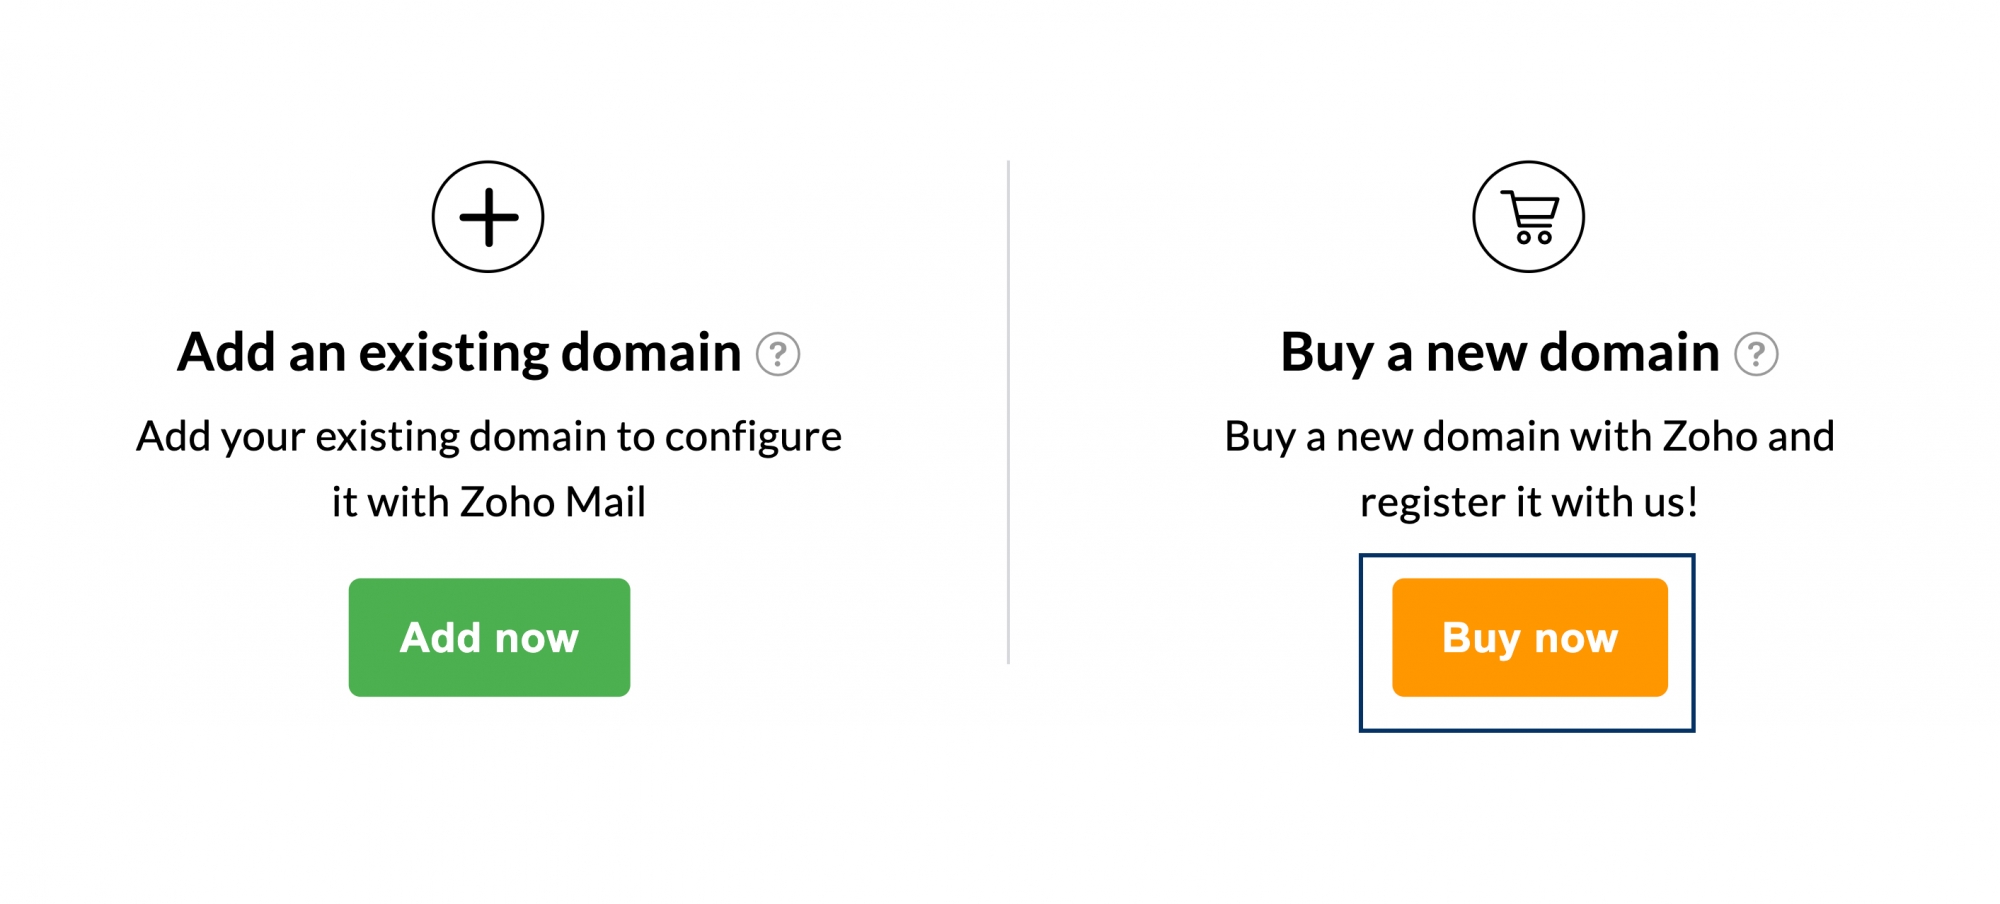
Zoho Mail offers versatile plans to meet the various needs of your businesses. Review the features and decide on the plan that suits your requirements. This will take you to the Domain Addition page where you can add your existing domain or purchase a new domain.
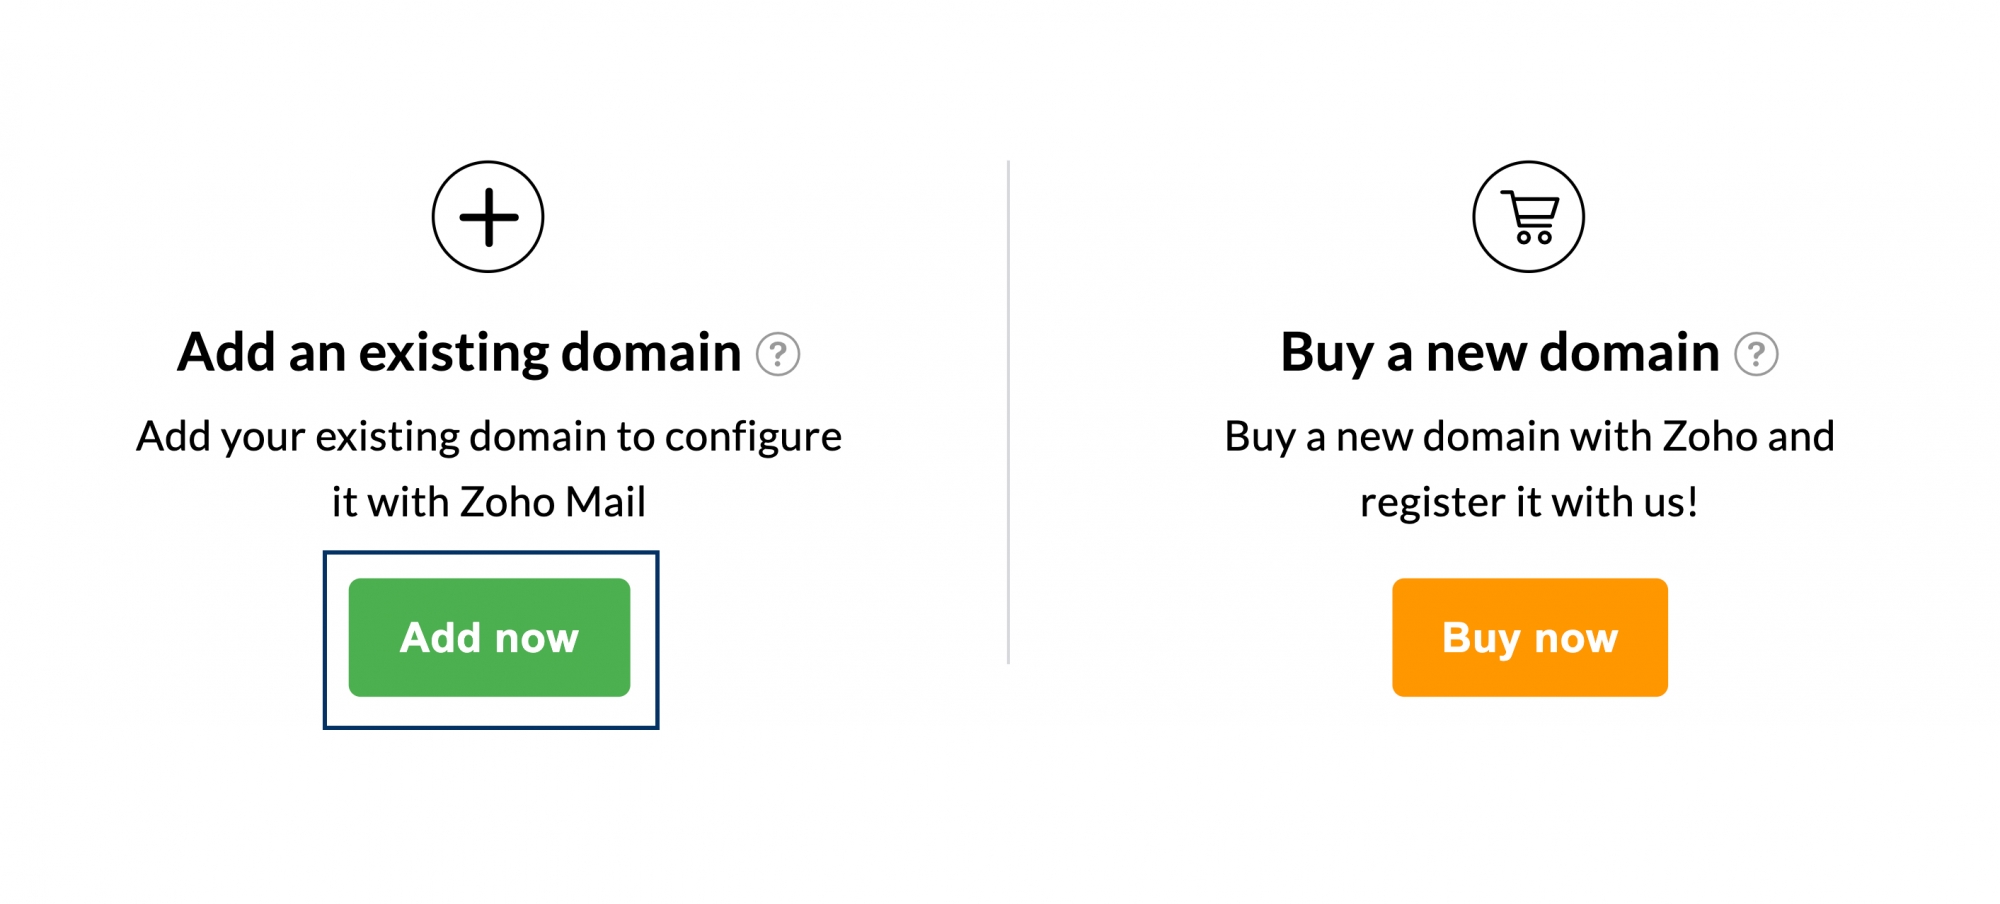
Add a Domain You Already Have
1. In the Domain Addition page, click the Add Now button below the Add an existing Domain section.
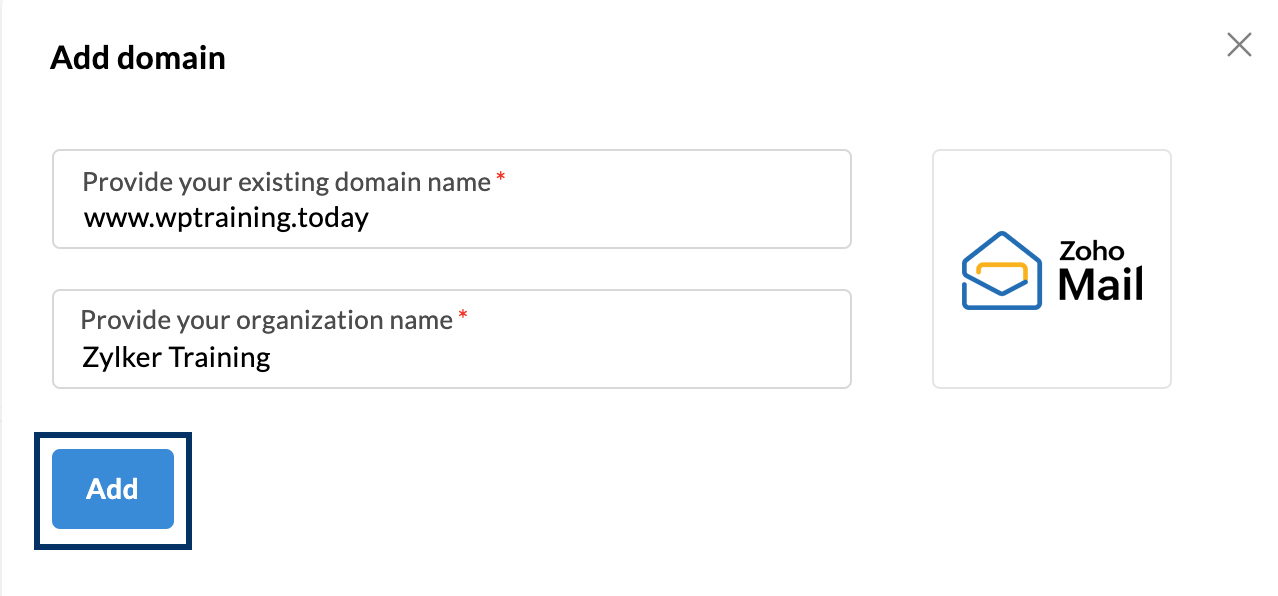
1. Enter your existing domain name, and organization name and choose the industry your business belongs to.
2. Once completed, click the Add button to proceed further.
1. Your domain has been successfully added! You can complete your subscription purchase by clicking the Proceed to Payment button.
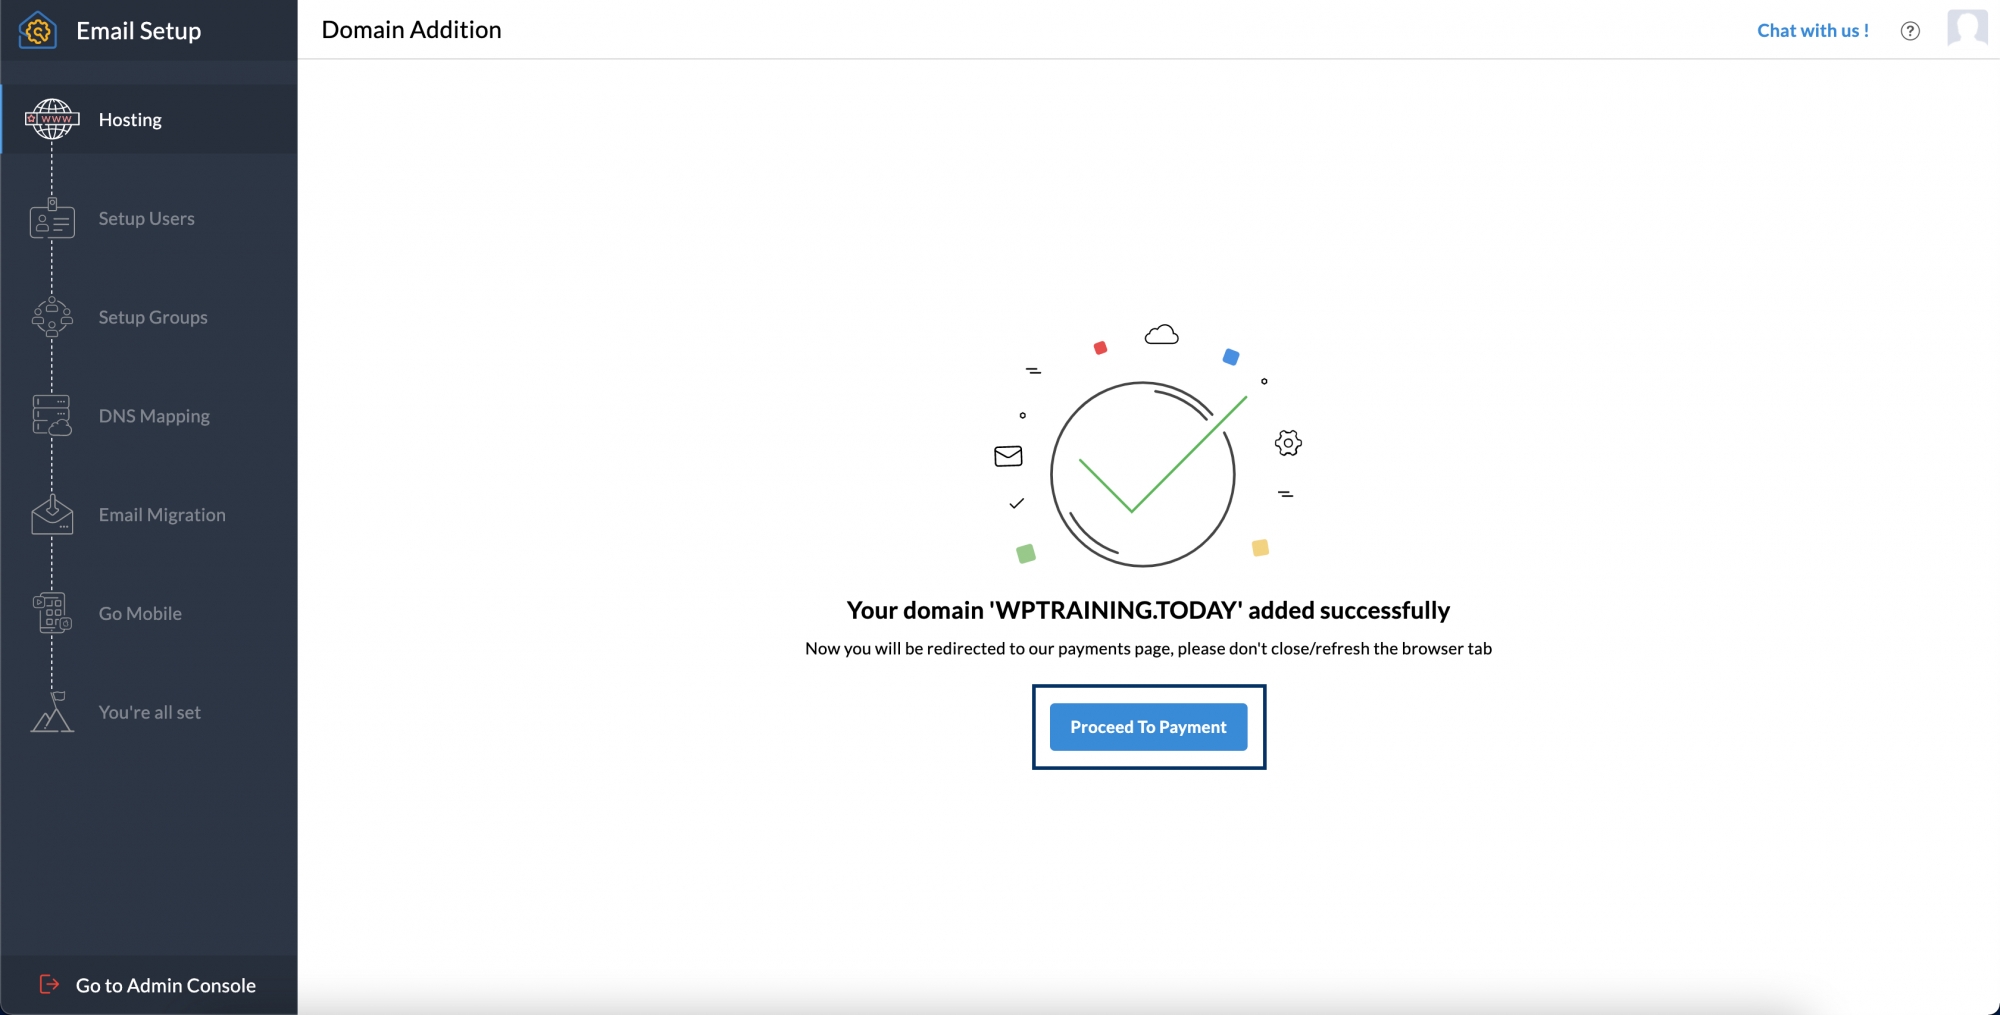
1. Enter the number of users you need and complete your payment process once you are redirected to the payments page.
Buy a Domain
In the Buy a New Domain section, click the Buy Now button.
2. In the text box, enter the domain name you need and search by clicking the icon or pressing enter.
3. You will see the suggested domain names based on what you entered in the previous step. Select the domain name you prefer and click the checkmark icon next to it.
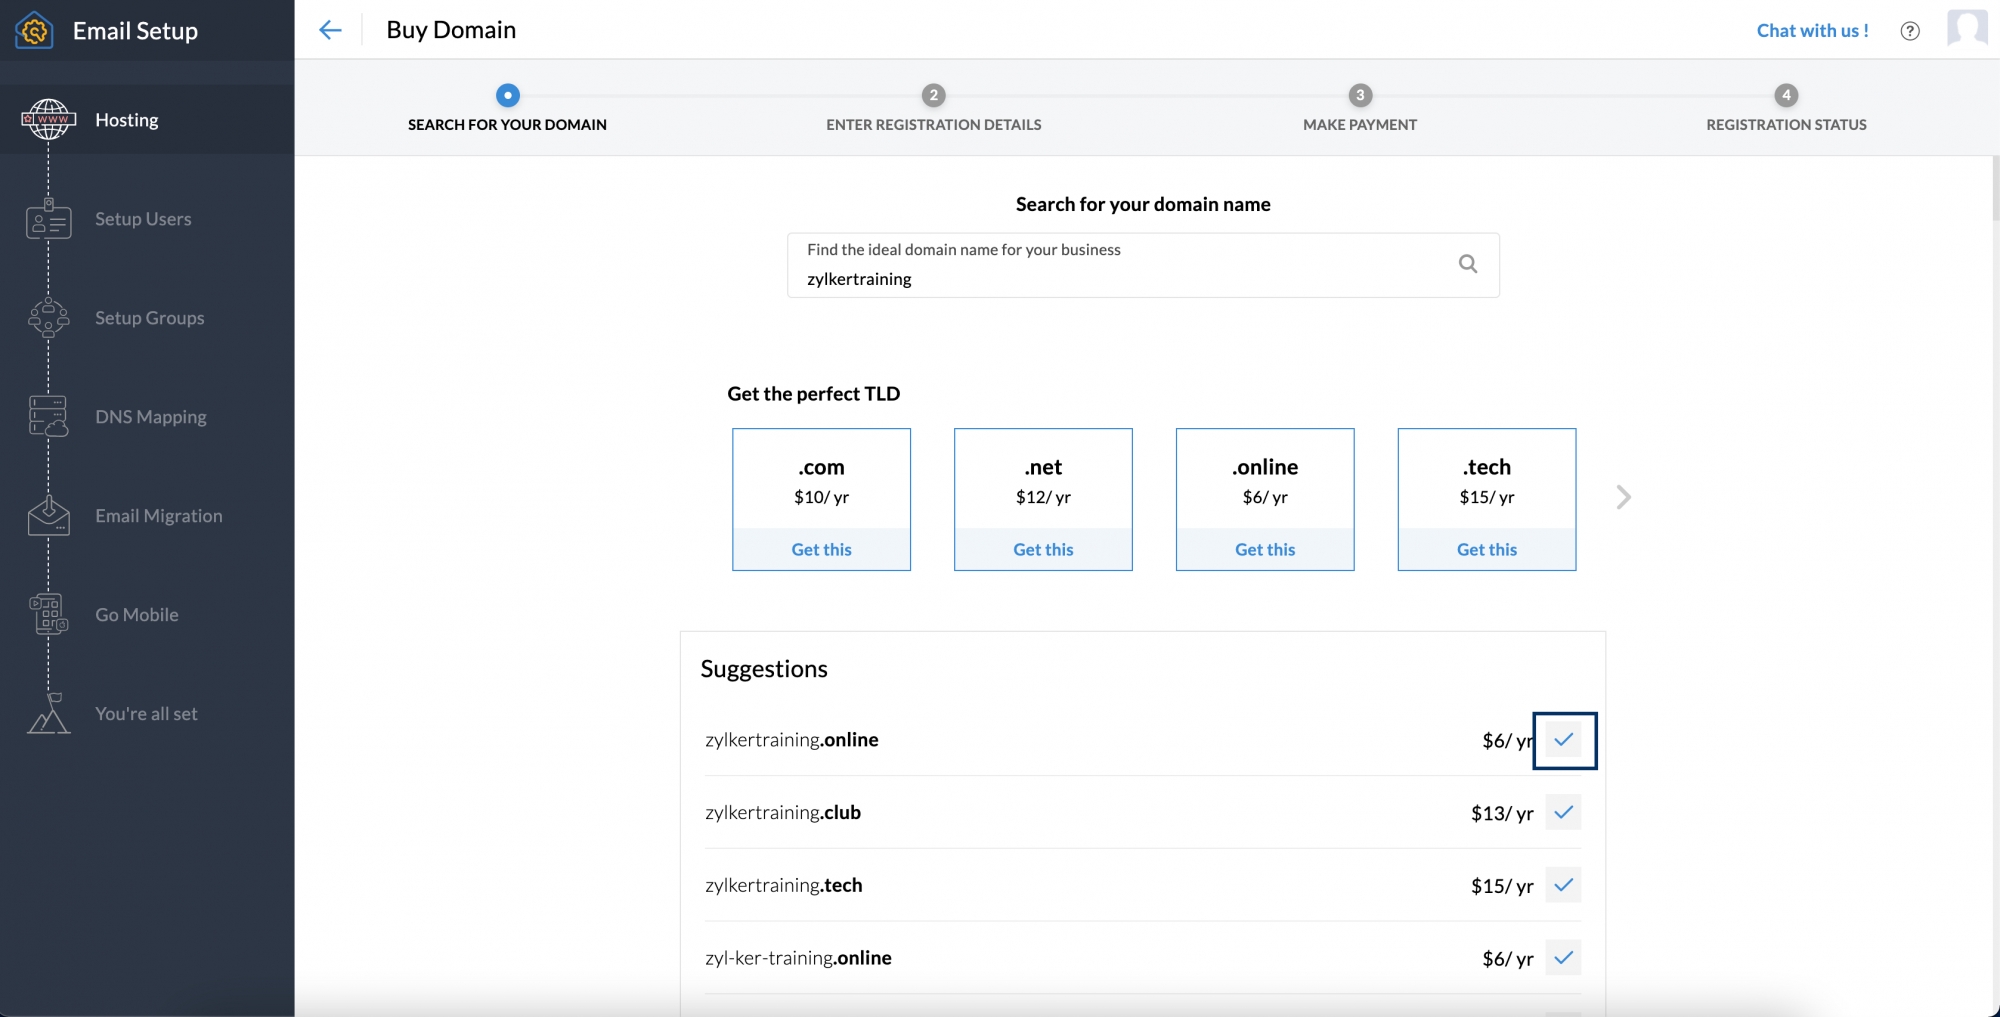
4. Check the price of the chosen domain and click Proceed to continue. Then you will be connected to the Domain Registration page.

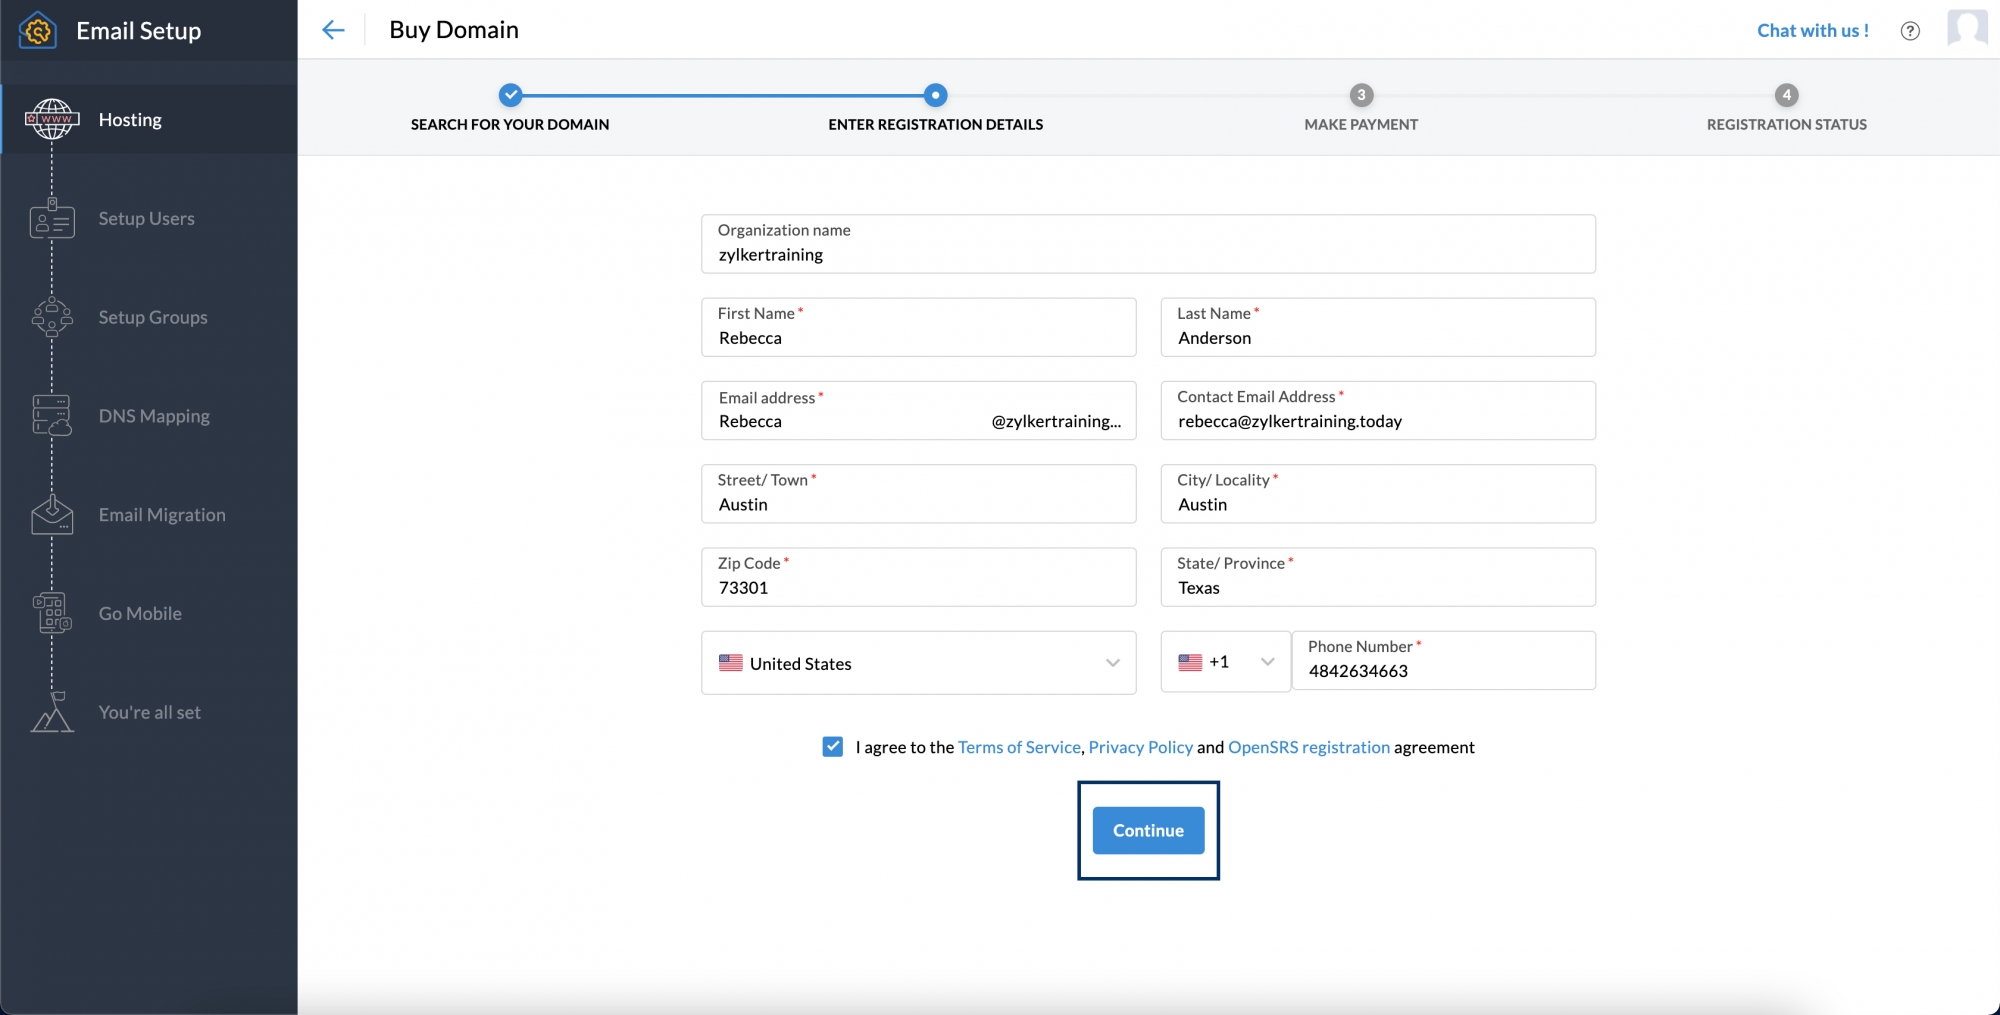
5. Type the required details. Then check the box to accept the terms and conditions of Zoho and the domain registrar. Then click Continue to proceed further.
6. Check carefully the spelling of the domain name and related details and click Pay Now. Then you will be redirected to the Zoho Payments page to proceed with the payment process.
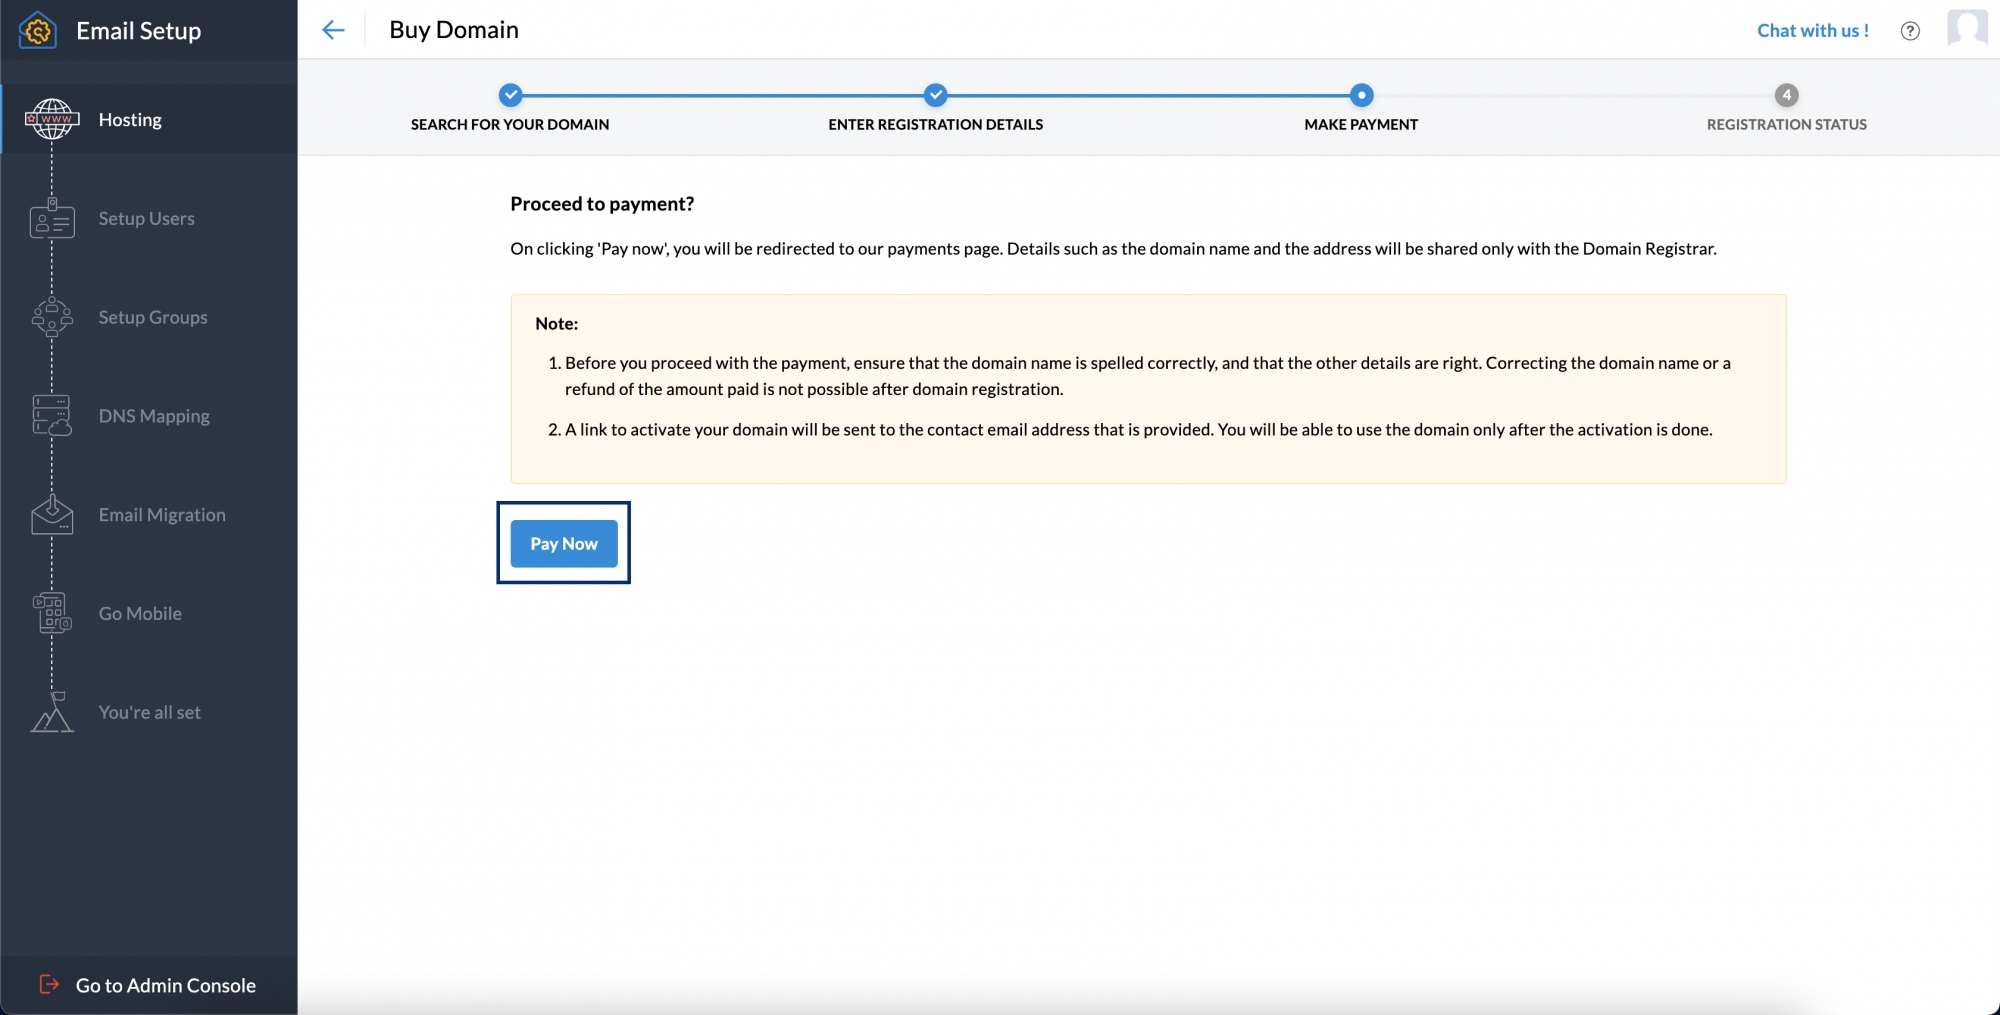
Payments
1. In the Plan Details section, you will have to type the details such as the number of user IDs you need, and any add-ons you want. Then click Continue.
2. On the summary page of your order, review the details thoroughly and click the Confirm button.
3.You must provide your billing address and payment info when reviewing your order.
4. Then click Make Payment to proceed to the Zoho Mail account Setup page. You can also select the Go to Zoho Workplace option.
Domain Ownership Verification
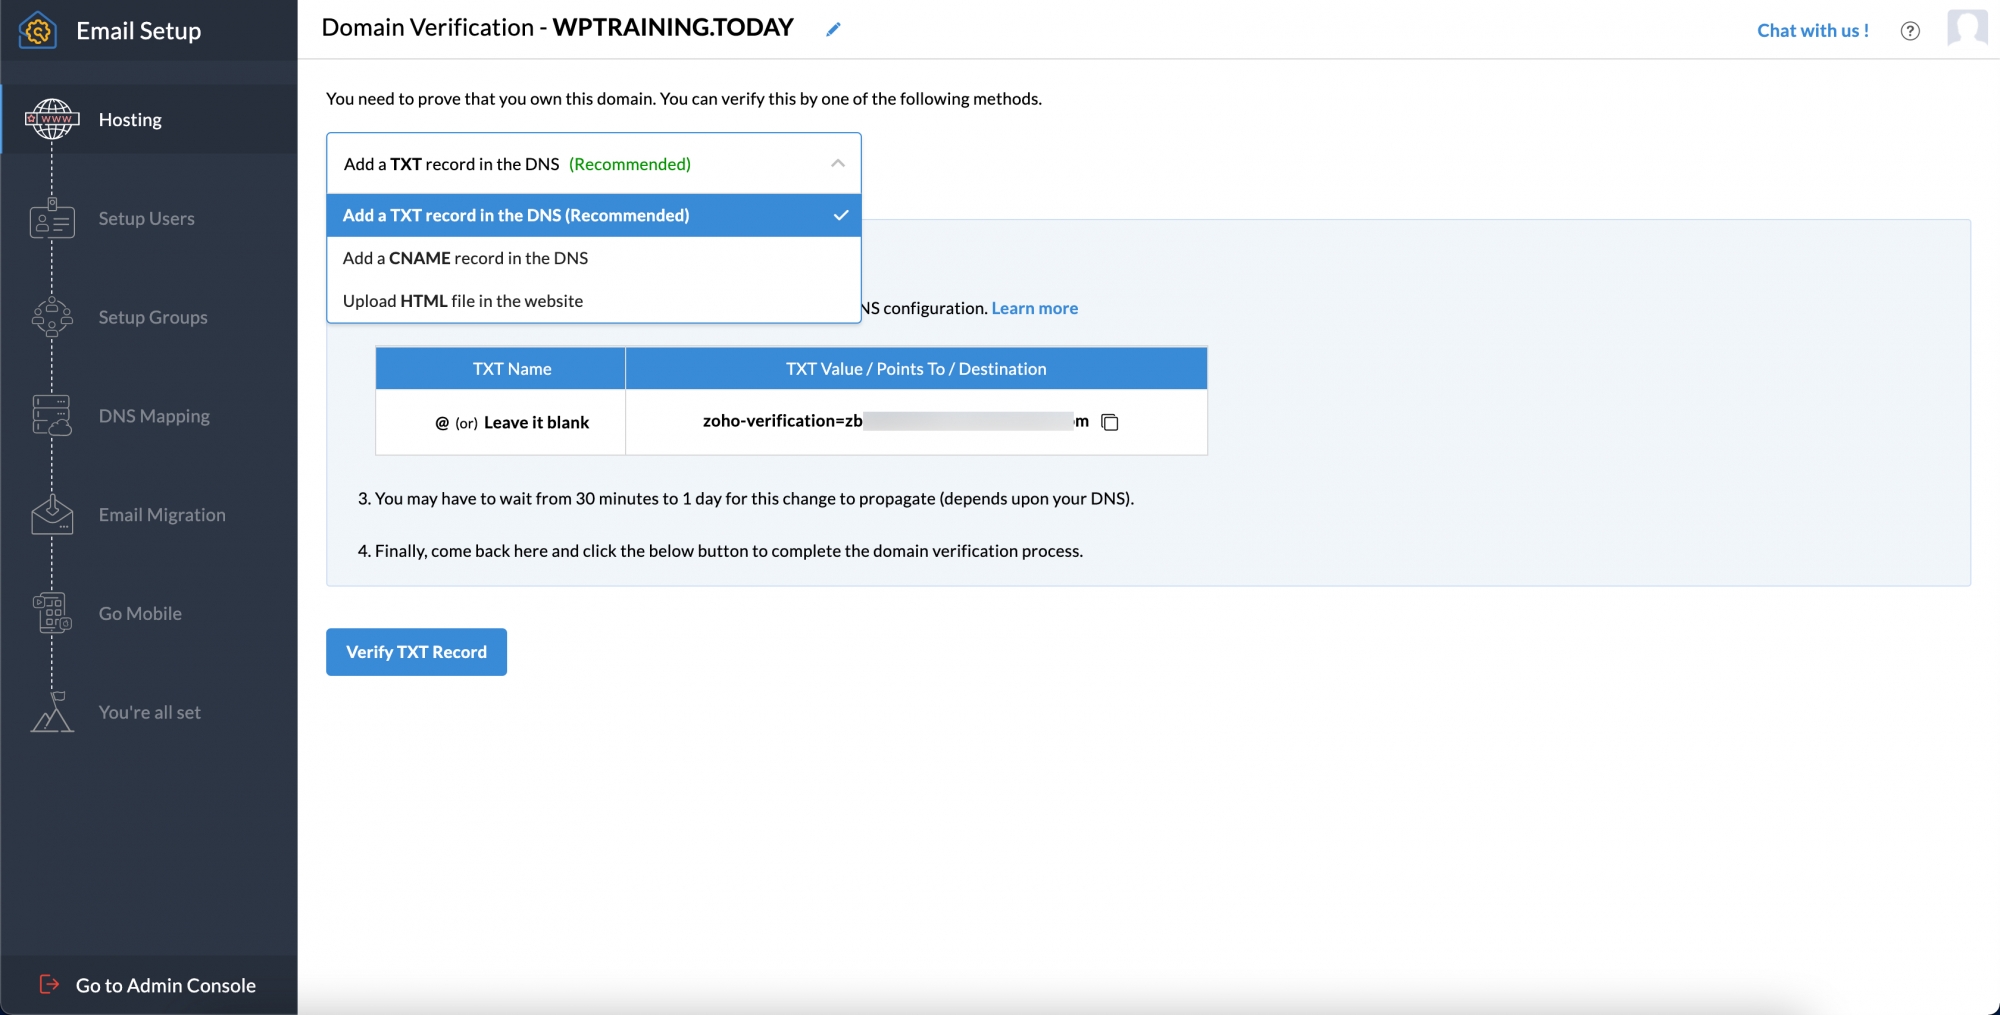
Now you can proceed to domain ownership verification by choosing any of the methods such as TXT, CNAME, or HTML, through the drop-down menu.
TXT Method
You can easily verify your account using the TXT method, through your Domain Registrar's DNS page.
1. Select Add a TXT record in DNS from the dropdown menu on the Domain Setup page.
2. Open a new tab and sign in to your account of the Domain Registrar.
3. Access your Domain Management or DNS Records page.
4. Find the option to add a TXT record and select Add. Next, select TXT from the drop-down menu.
5. On Zoho's Domain Settings page, you will see details related to the Host field and values for adding TXT records.
6. In the host field, you can leave it without adding anything, use '@', or enter your domain address.
7. For the Value field, you can replicate the format "zo** -ve**********=zb1*******.zm******.z***.c**". The value will be unique for each domain, and you can get it from Zoho's Domain Setup page. Next, enter the value into the TXT Value field.

8. If TTL can be modified, choose the shortest available duration for faster verification. Then click Save.

9. Patiently wait for an hour or two. Then click the Verify TXT Record button on Zoho's Domain Setup page.
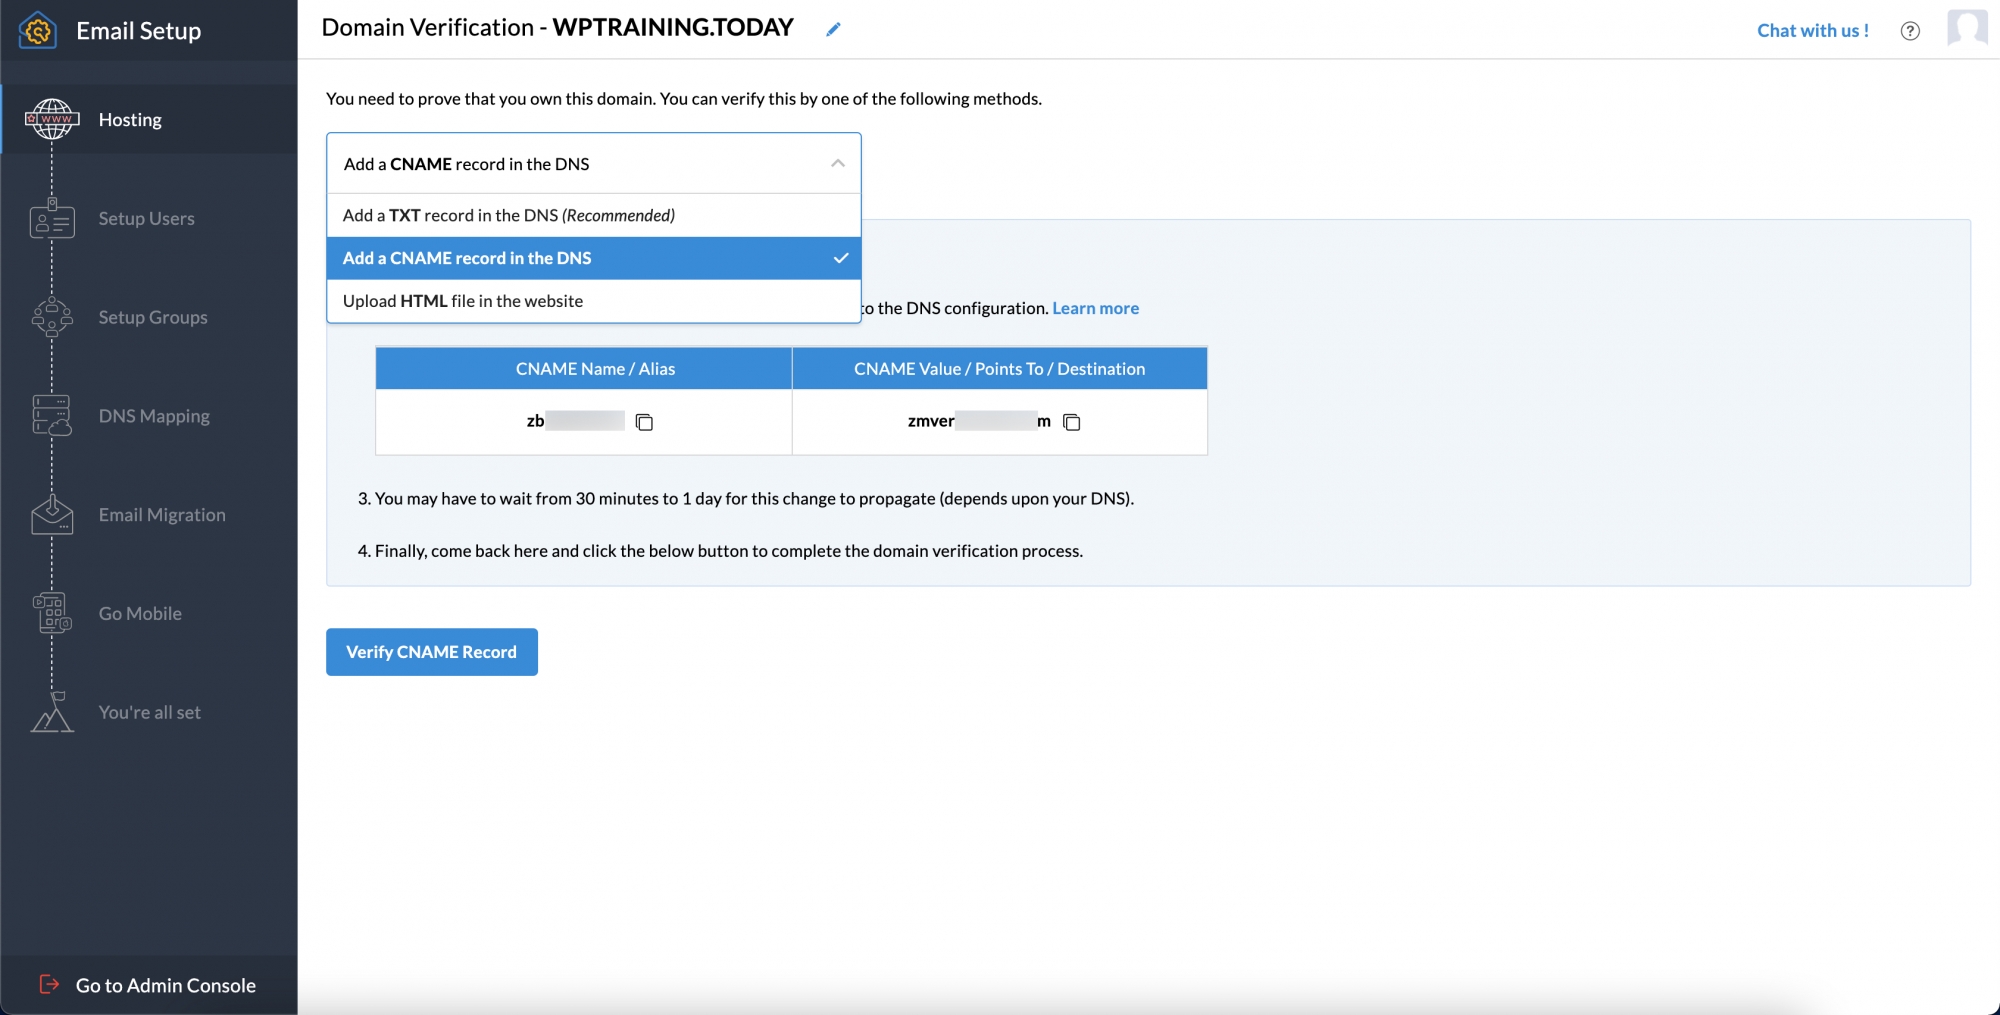
CNAME Method
You can easily verify your account using the TXT method, through your Domain Registrar's DNS page.
1. On the Domain Settings page, select Add CNAME Record from the drop-down menu in the DNS section.
2.Open a new tab and sign in to your domain registrar account.
3. Go to your Domain Management Page or the DNS record page.
4. Situate the option to create a CNAME record and click Add. Then select CNAME from the drop-down list.

5. On Zoho's Domain setup page, you will find information for the Host and Points to fields for adding a CNAME record.
6.Use the value "zb15*****4" for the Host field. You can get the value from Zoho's Domain Setup page. Then paste the value into your domain's DNS page. Note that the value will be different for each domain.

7. In the Points to field, enter "zmverify.zoho.com."
8. If TTL can be modified, choose the shortest available duration for faster verification. Then click Save.

9. Patiently wait for an hour or two. Then click the Verify CNAME Record button on Zoho's Domain Setup page.
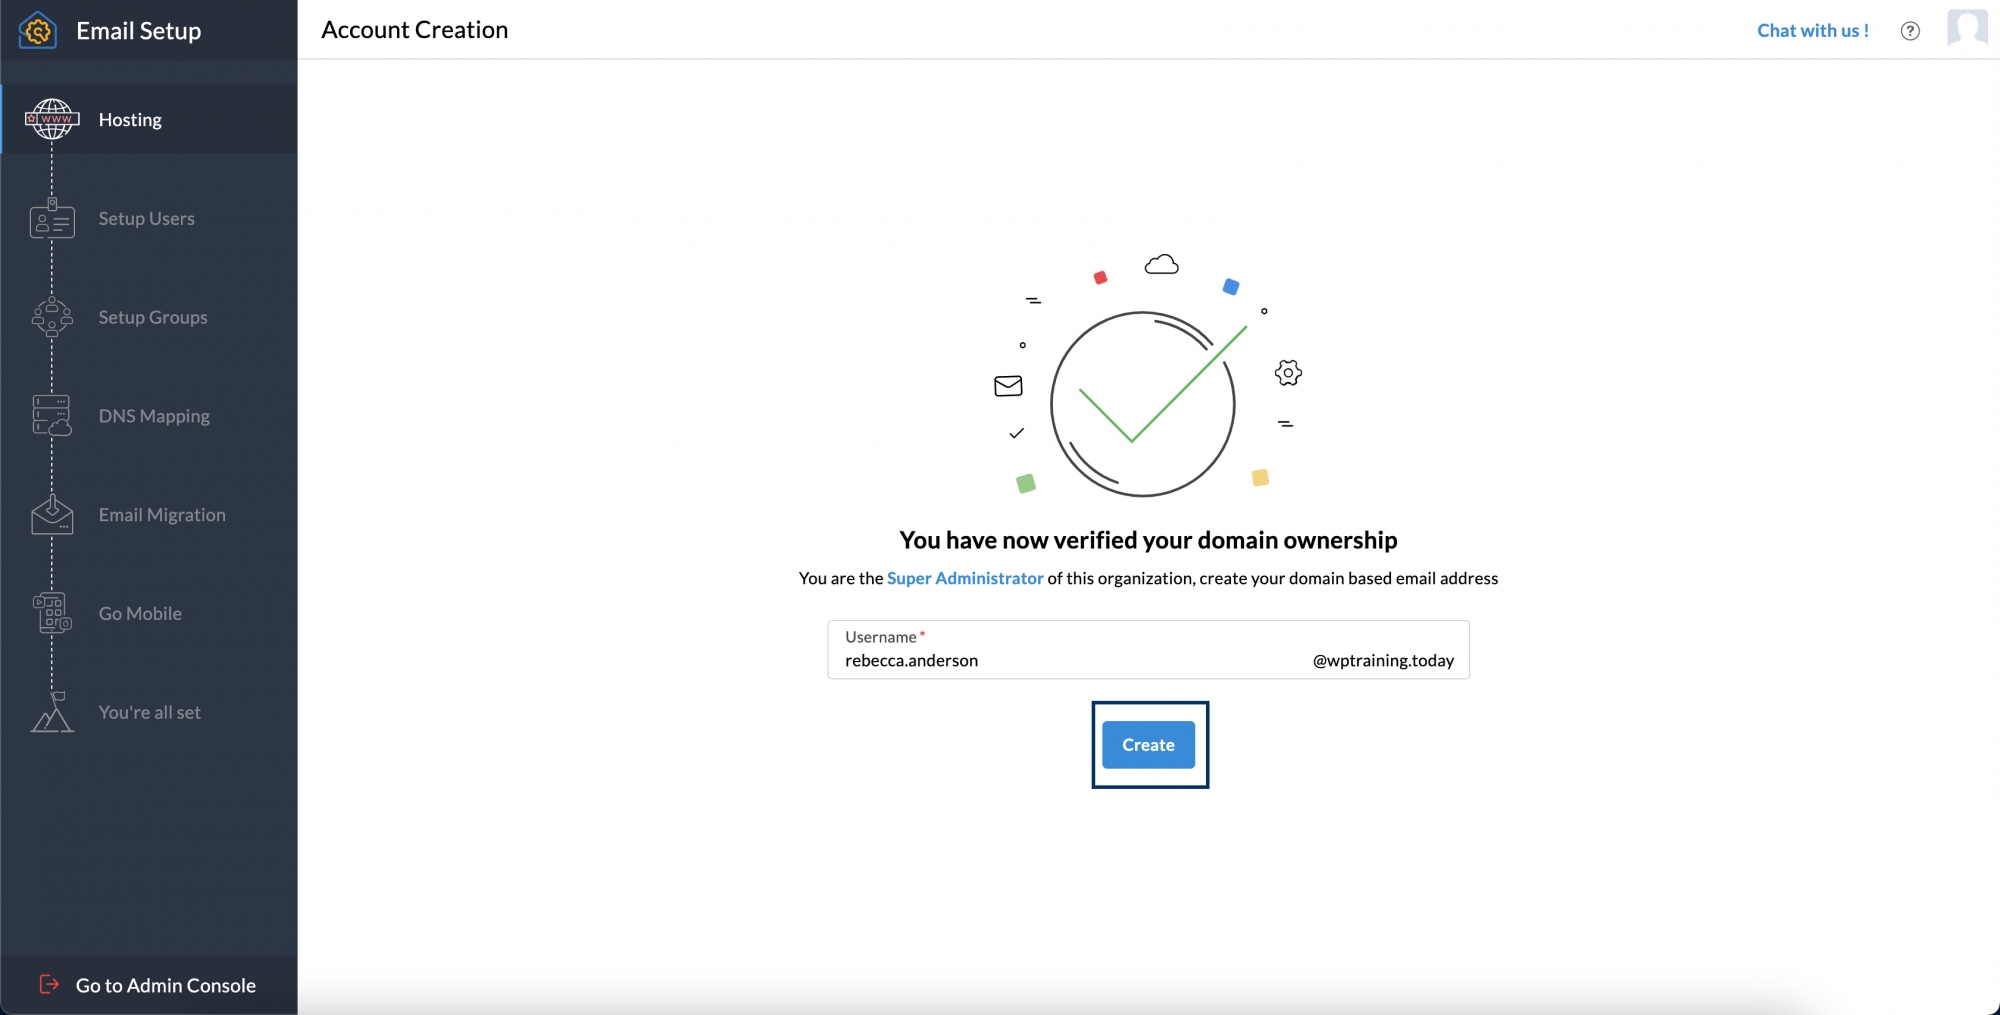
Setting Up Your Organization
You need to assign a name for the initial user of your organization. By default, this user will serve as the super admin
1. Enter the username and click Create.
2.Now you can move on to the Users page to include members in your organization.
3. Zoho Mail offers multiple convenient methods for adding users, allowing you to choose the one that best suits your needs.
a. Add Users on an individual basis.
b. Import Users via a CSV file.
c. Invite a user to be a part of your organization.
d. Import from G Suite
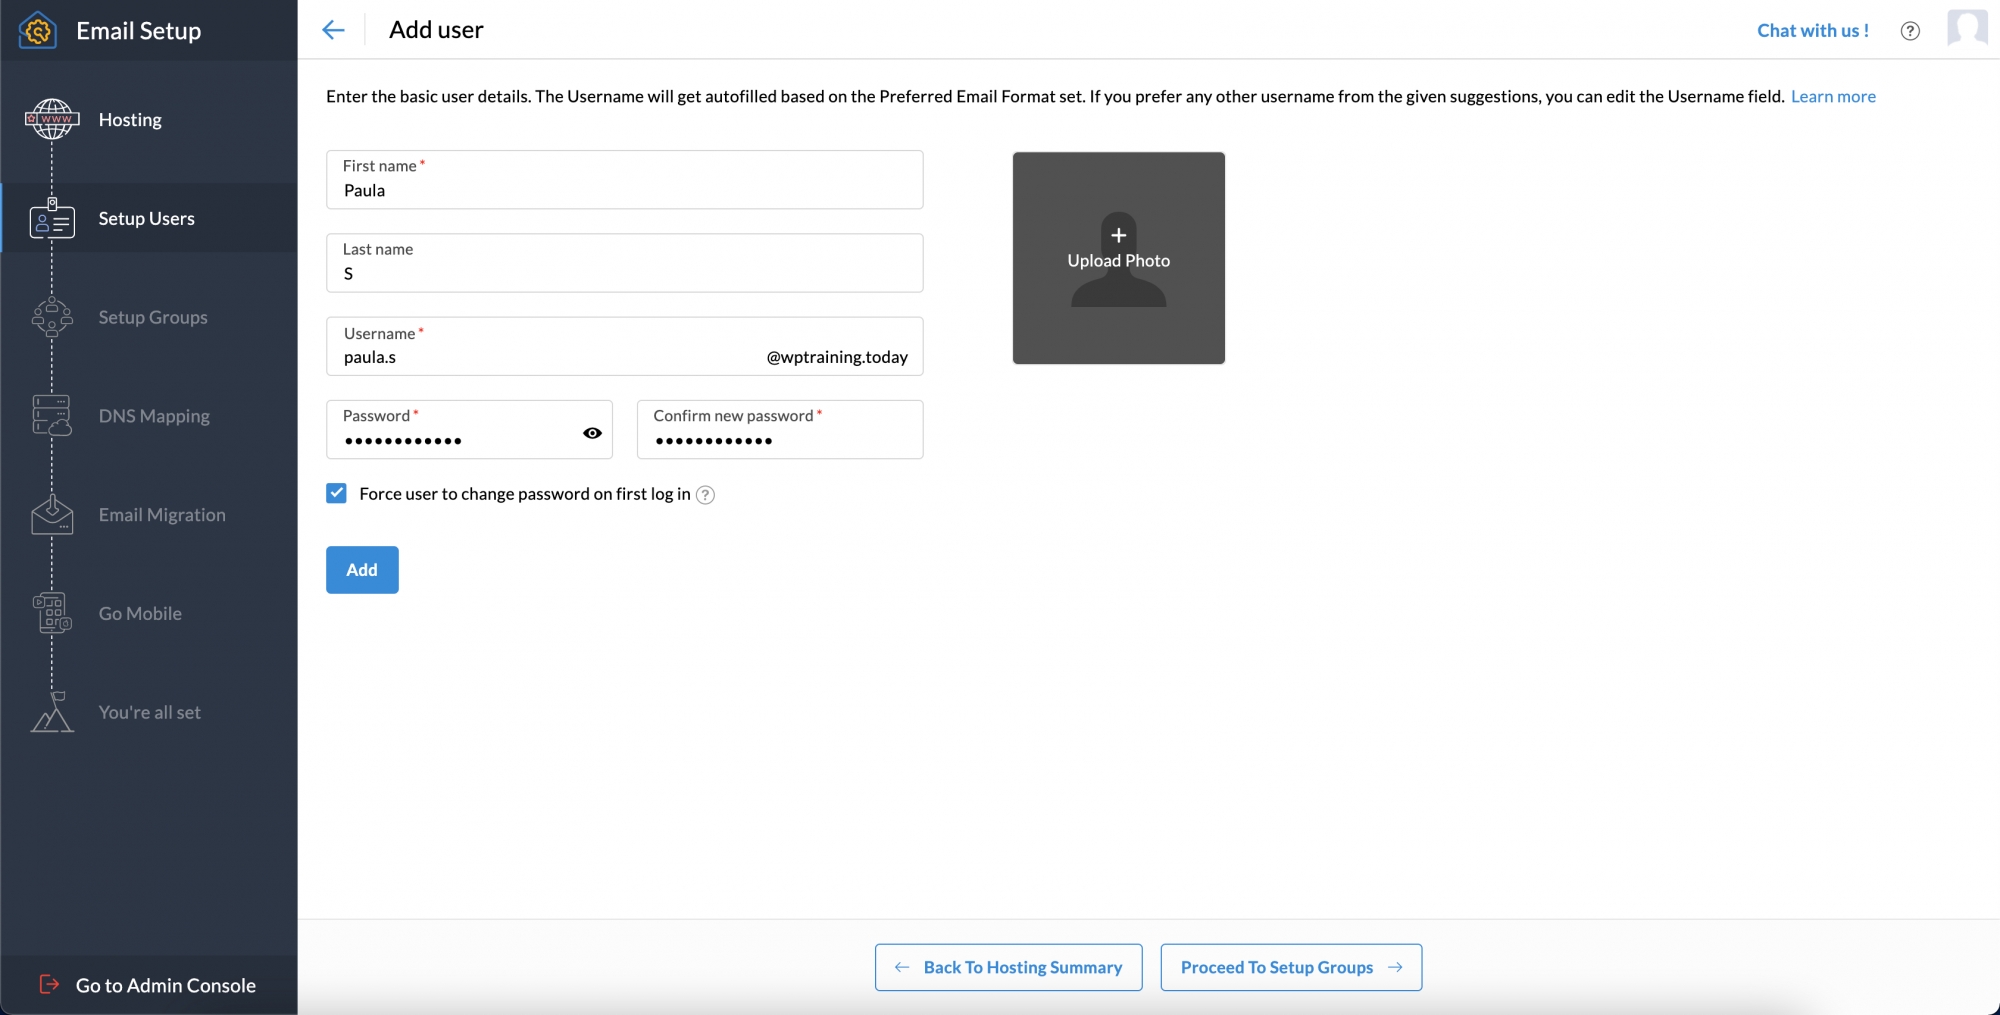
Add Users on an individual basis
1. Click the Add button to include the desired users.

2. Enter your first name, last name, and desired username. Set a secure password for future logins. You can allow the user to change their password upon their first login.
3. Click Add to complete the user account creation in your organization.
4. If you want to add users again, follow the above steps.
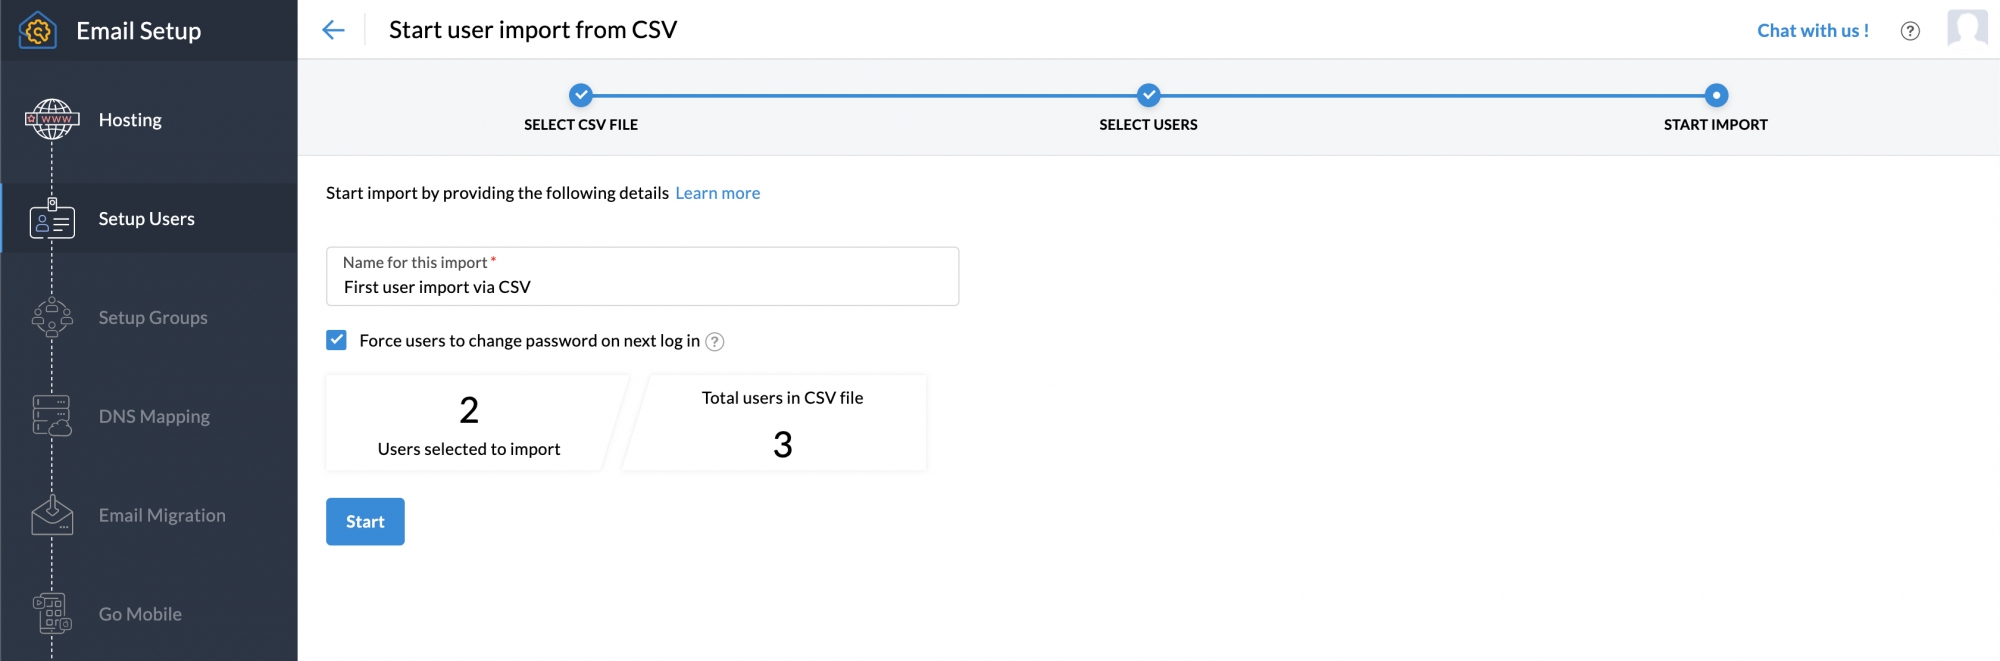
Import Users via a CSV file
1. Select the Import option and then choose the option to Import using CSV file. Then click the Start Import button.

2. Use spreadsheet apps like Zoho Sheets or Excel to create the .CSV file.
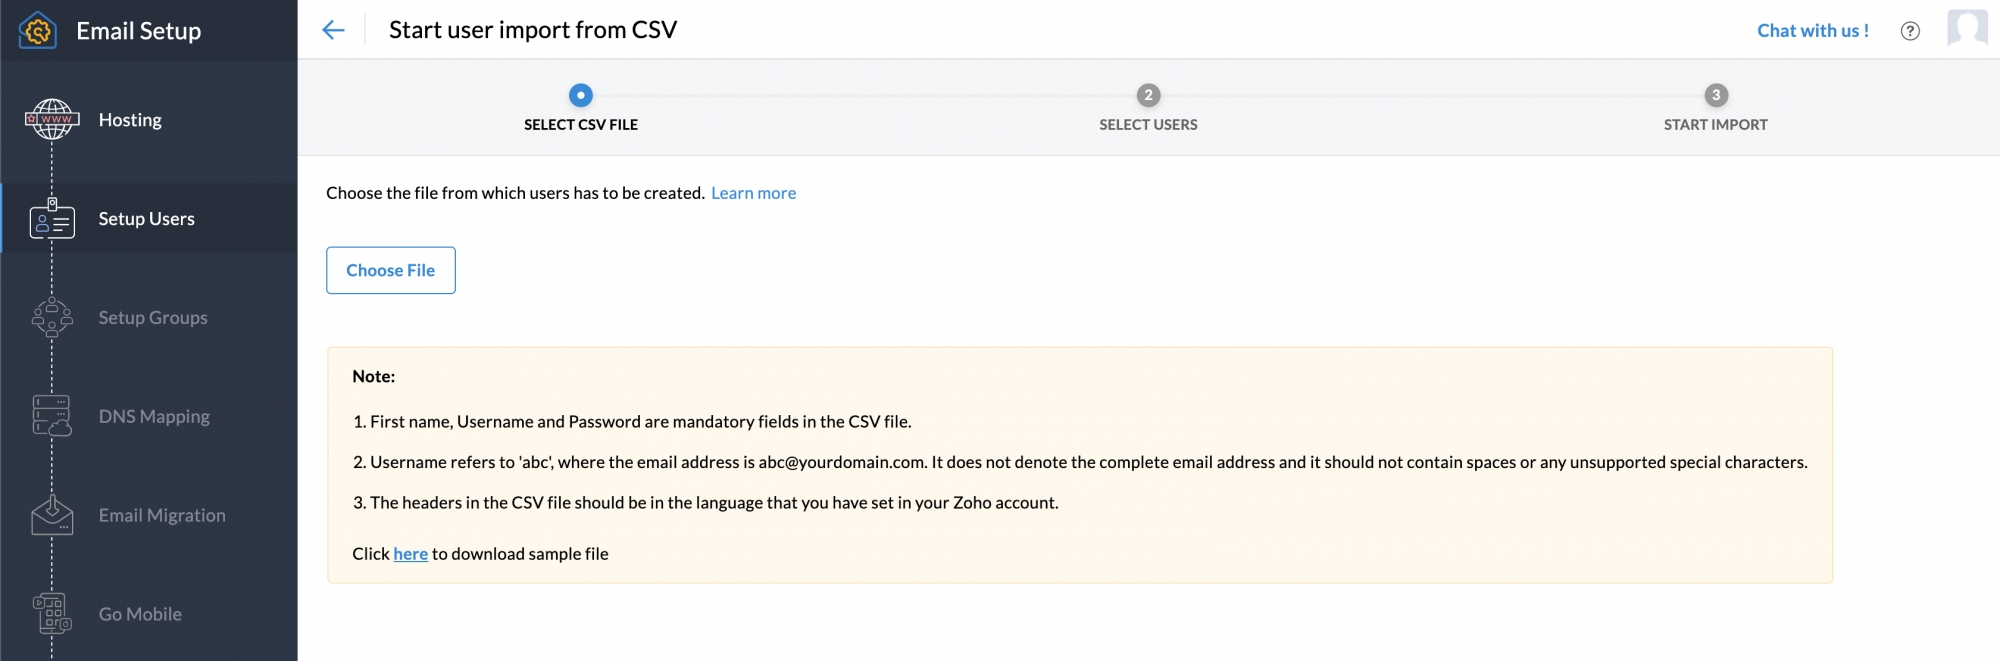
3. Click Choose File and select the desired file.
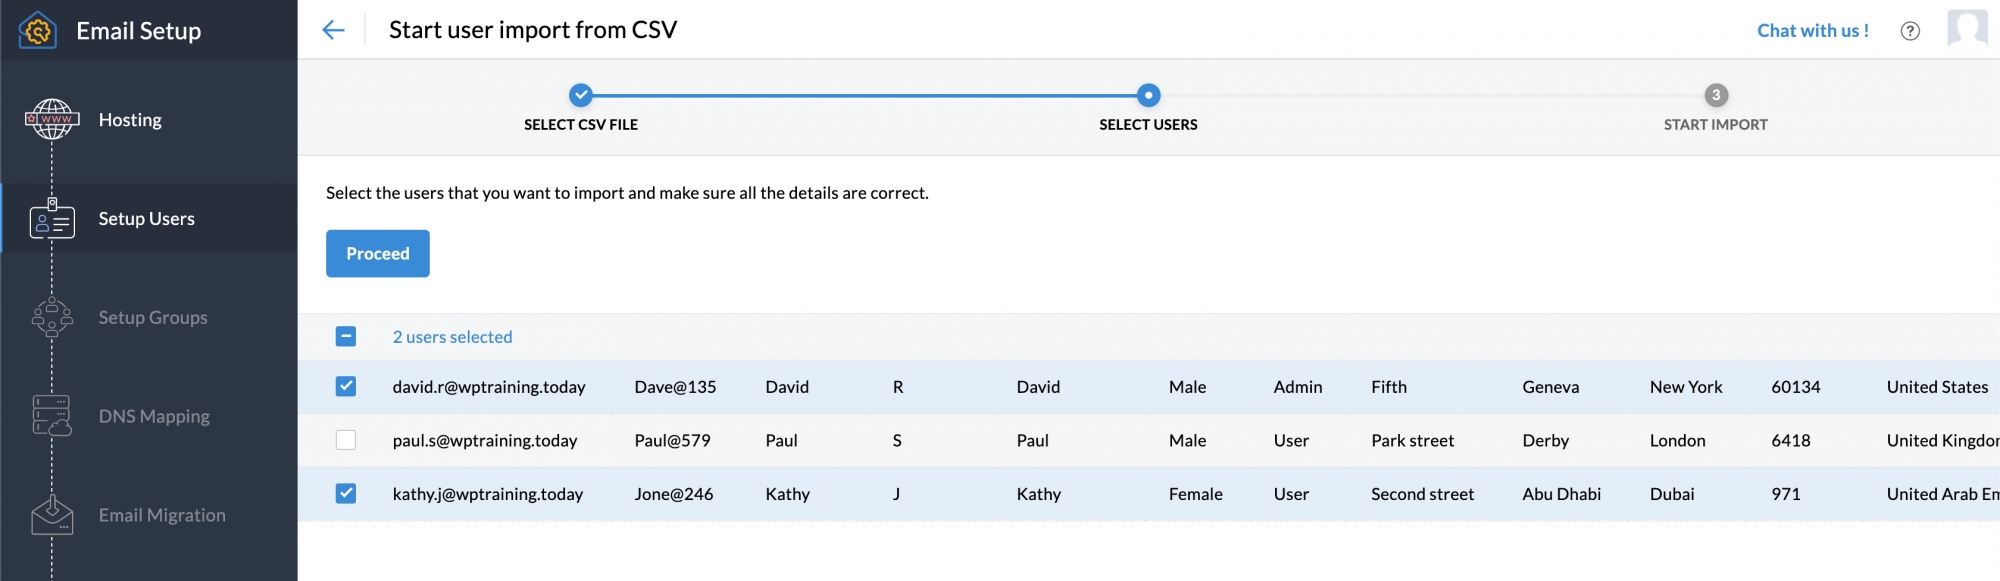
4. You can import users from the .CSV file by either selecting all or choosing a specific number of users based on your needs.
5. After selecting the users for import, you have to click the Proceed button to continue.
6. Type a name to your import for future reference. You can allow users to reset their password during their initial login.
7. Once completed, click Start. Visit again the Import via CSV page in the Admin Console to check the import status.
Groups
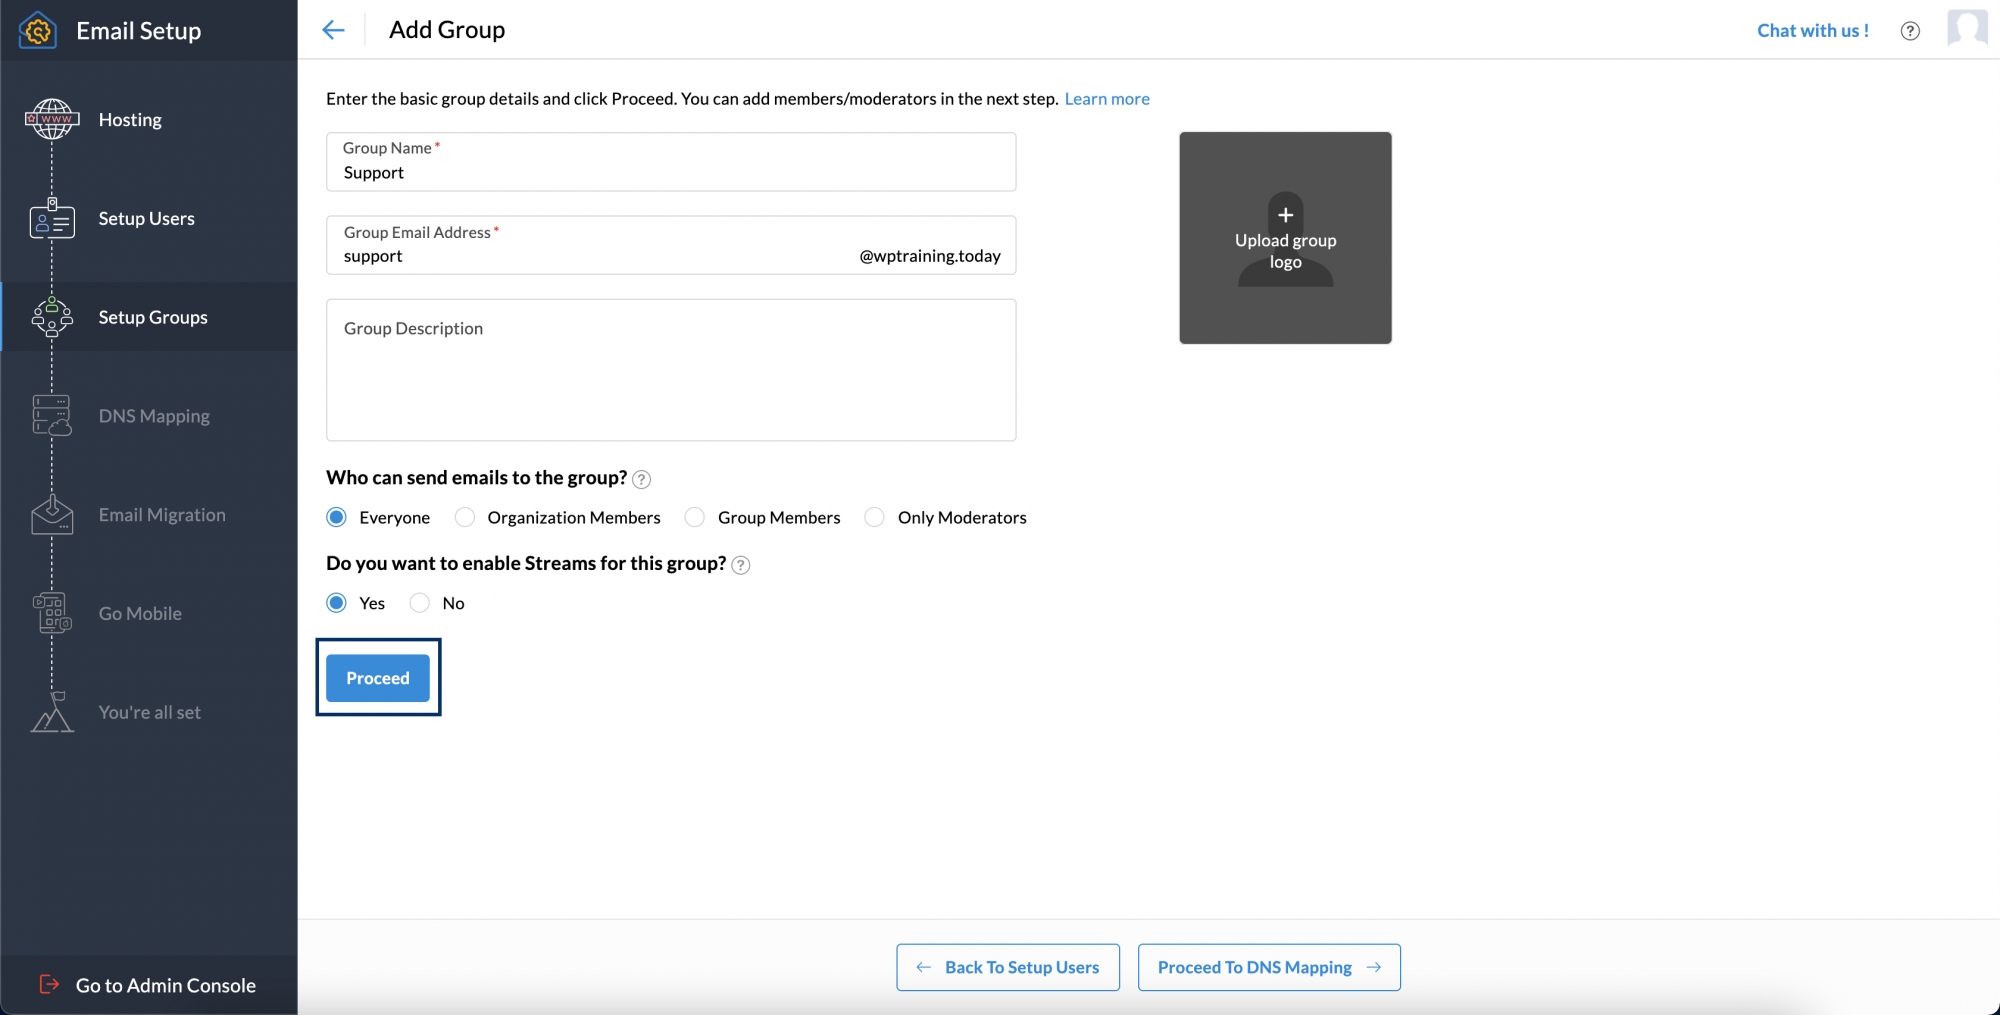
Here’s how to create a group:
1. In the Admin console, go to the Groups section by selecting Setup Groups, then click the Create your first group now button to get started.
2. Type your group name, email address, and description. You can also choose the group of people you want to send the emails to.
3. You can activate streams for the group and then click Proceed to move forward.
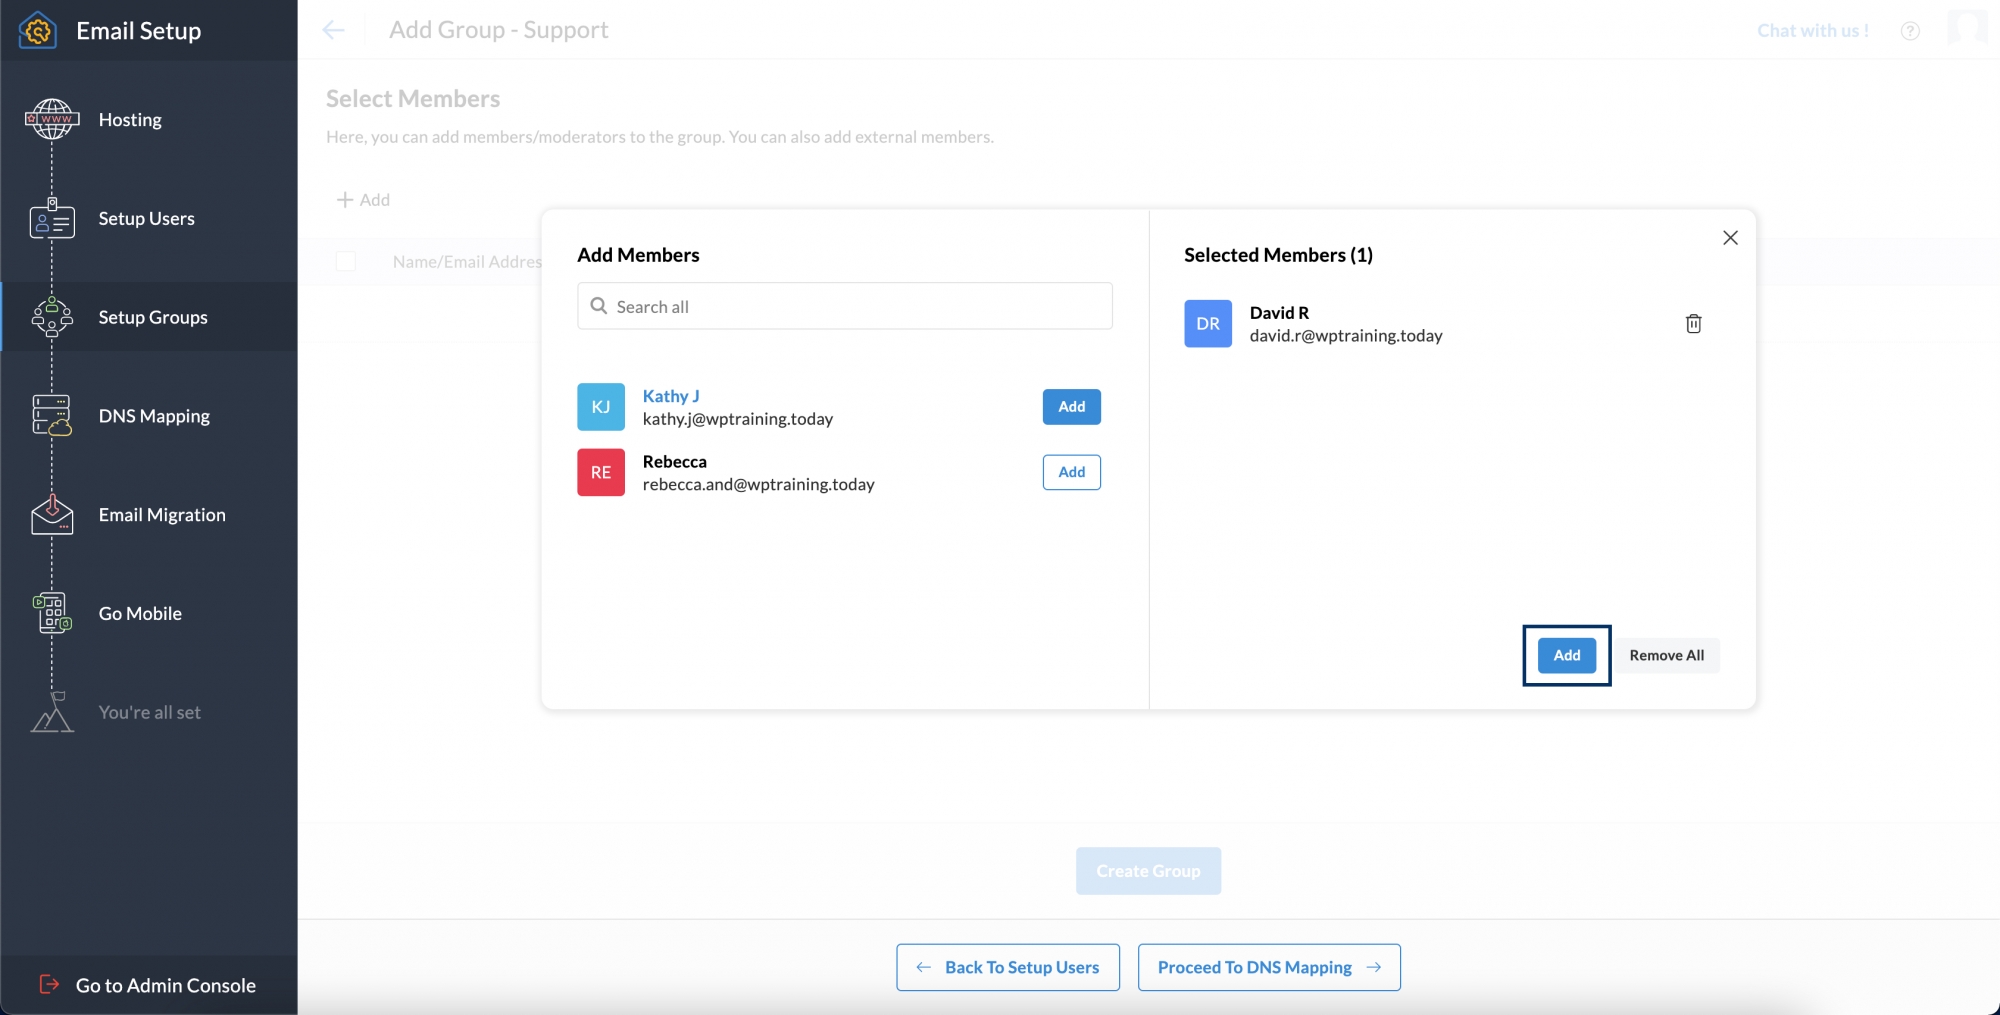
4. On the Select members page, click Add. You can include the users of your choice here.

5. A list of users will appear, and you can select from it. You can click the Add button next to the individual user and click Add again under the list.
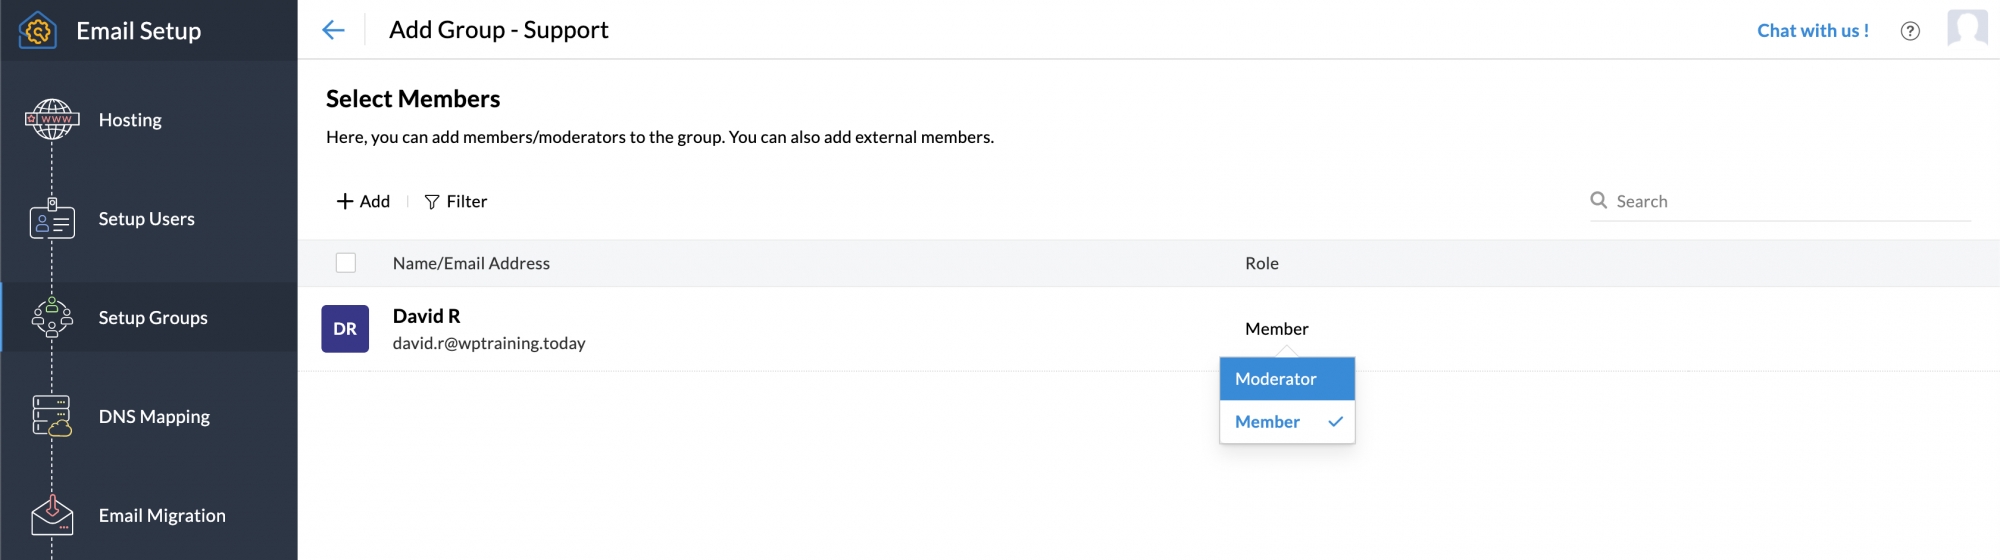
6.You can assign the role of the individual as a member or a Moderator.
7. Click Create Group to complete the process.

DNS Mapping
Mapping emails with Zoho Mail is essential for establishing business email accounts.
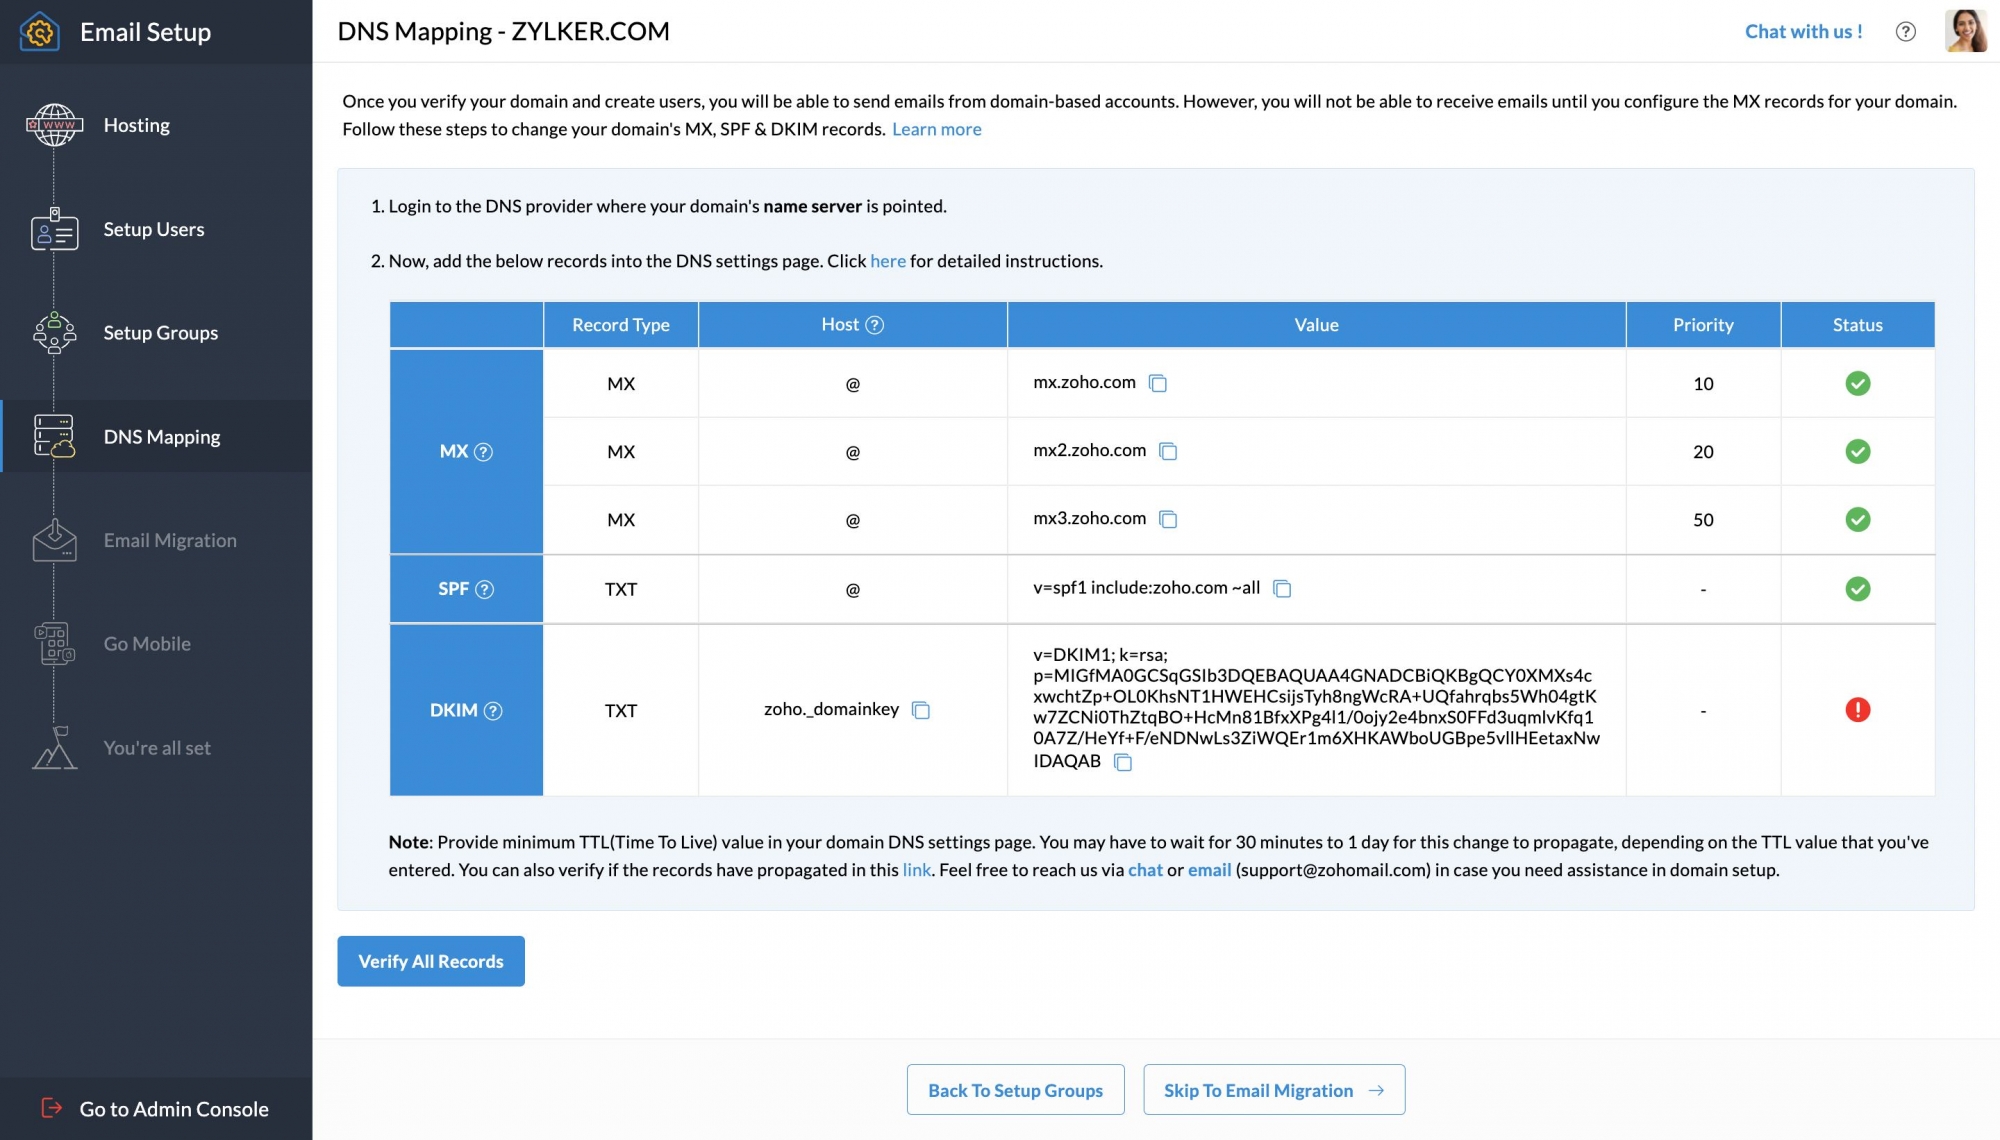
Steps for DNS Mapping
1. On the domain configuration page of Zoho, you can select the Proceed to DNS mapping.
2. Log into your domain registrar's web portal and navigate to the Domain Management Dashboard, DNS Control Panel, or DNS Manager section of your account.
3. Find the section for configuring MX Records, email servers, or email settings to update the MX Records.
4. Please note that it is required to delete the current MX record entries.
5. Look for the option to add a new entry and choose it.
6. Mention the Name/Host/ Subdomain as "@" or leave it empty.
7. For the first record, set the Points to Value as "mx.zoho.***"
8. Type Priority to 10 and click Save.
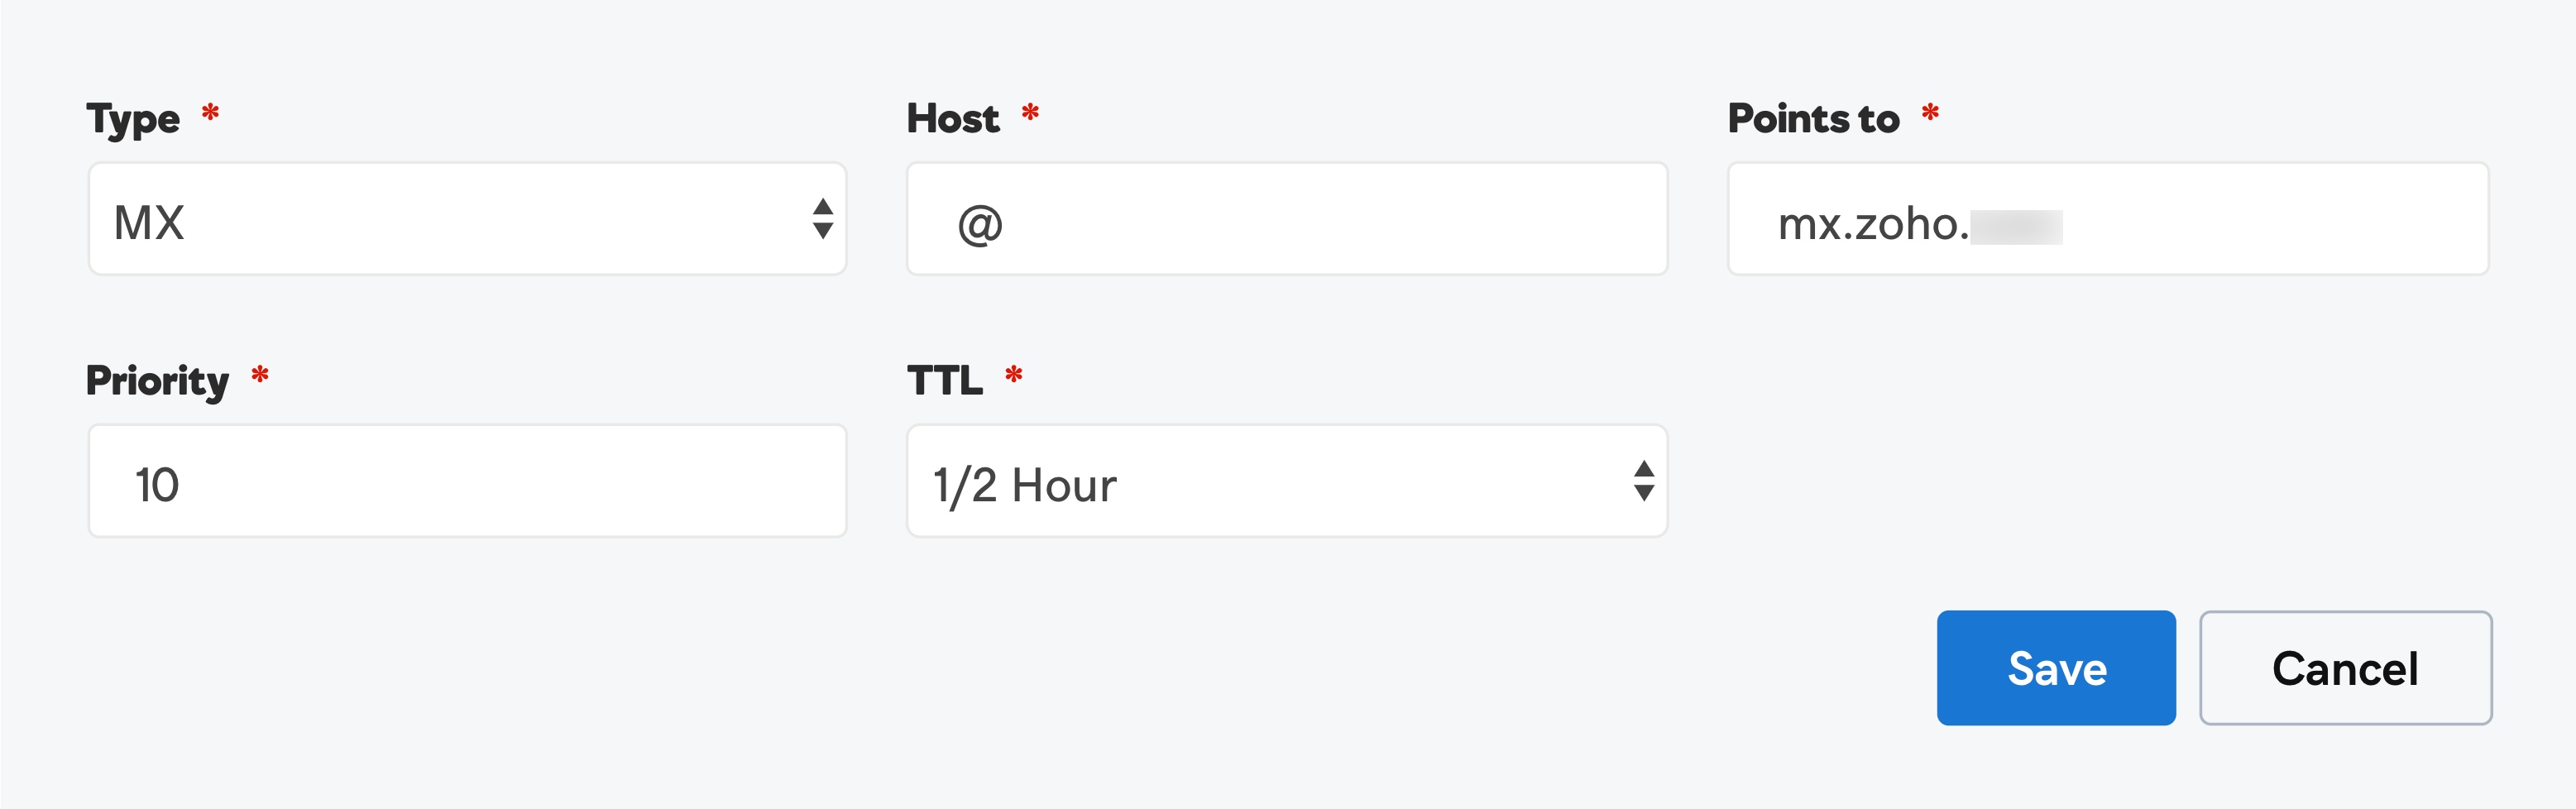
9. You can add a second (mx2.zoho.***) and a third (mx3.zoho.***) MX record by following the above steps. Assign priority levels of 20 and 50, respectively.
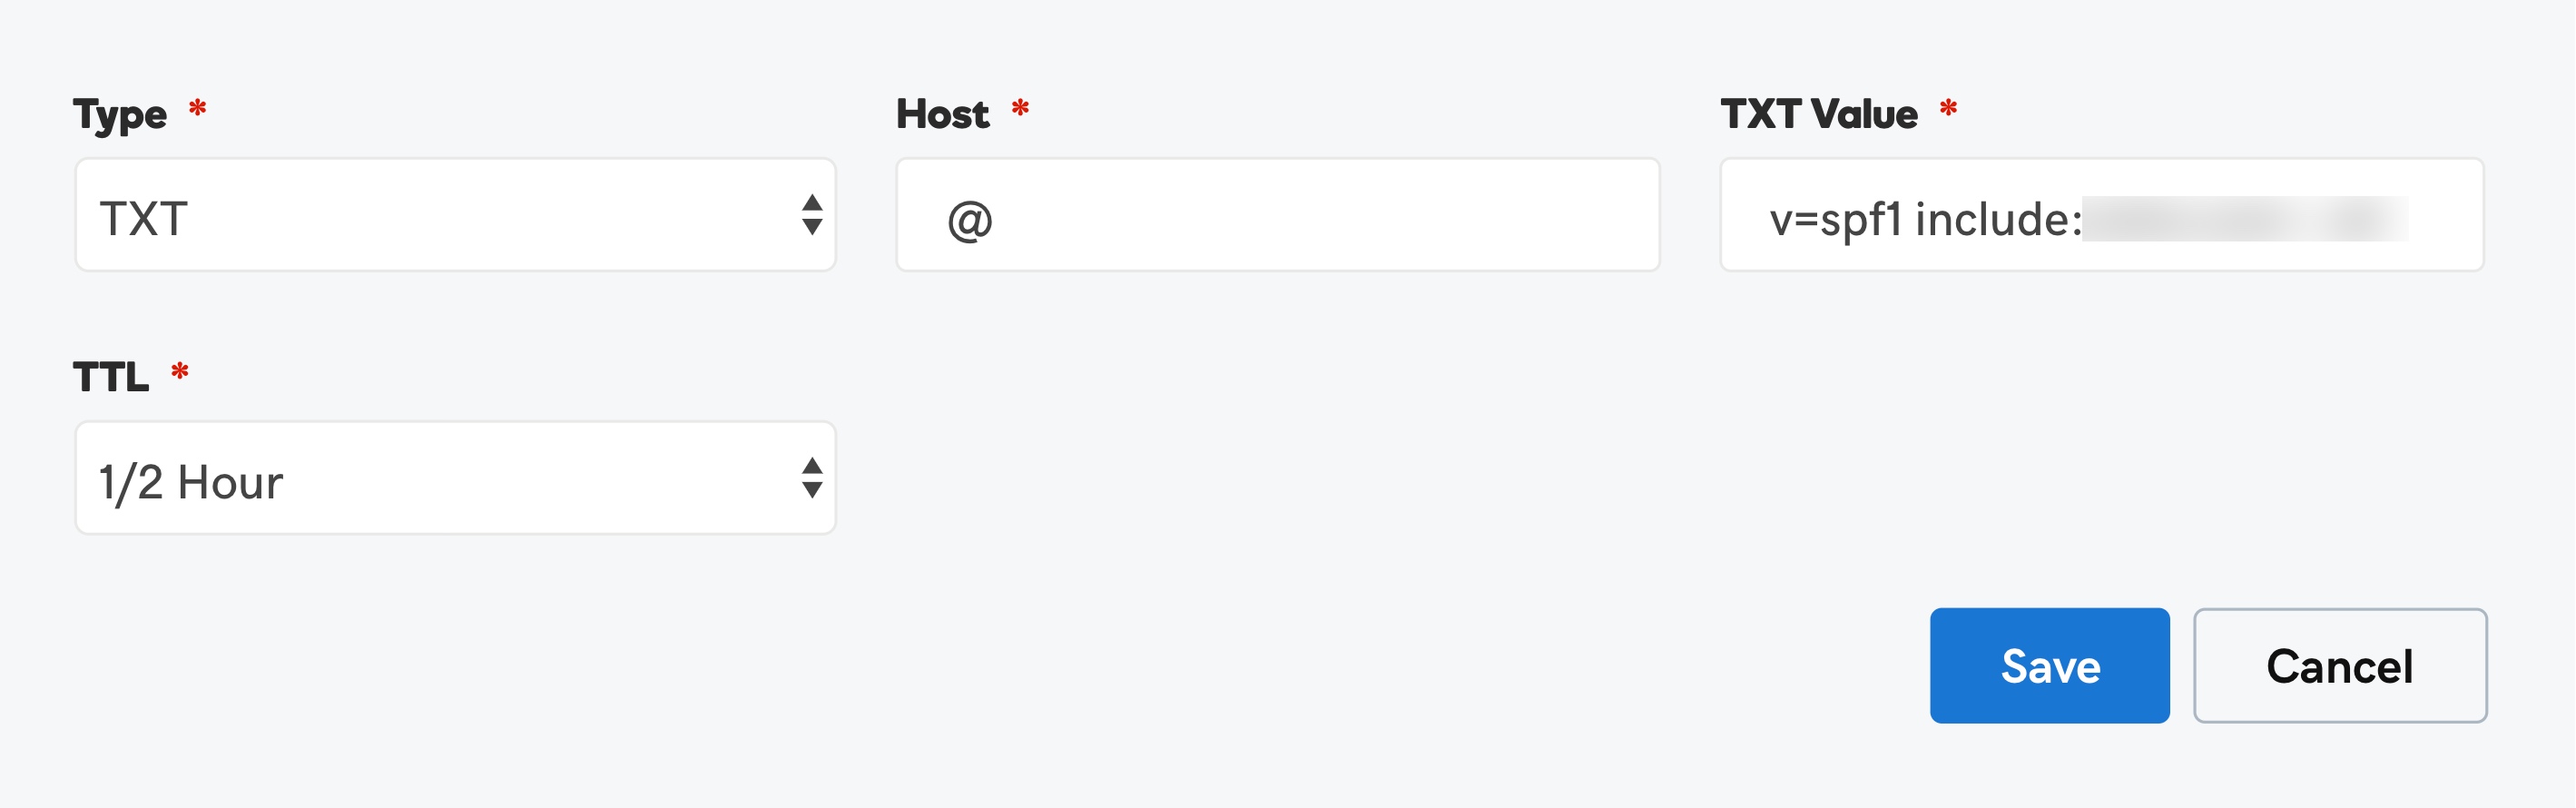
10. Find the section for creating a TXT record, then choose the Add option. This ensures adding of SPF records.
11. Mention the Name/Host as "@". Type "v=**** include:zoho.*** ~all" and click Save in the TXT Value field.
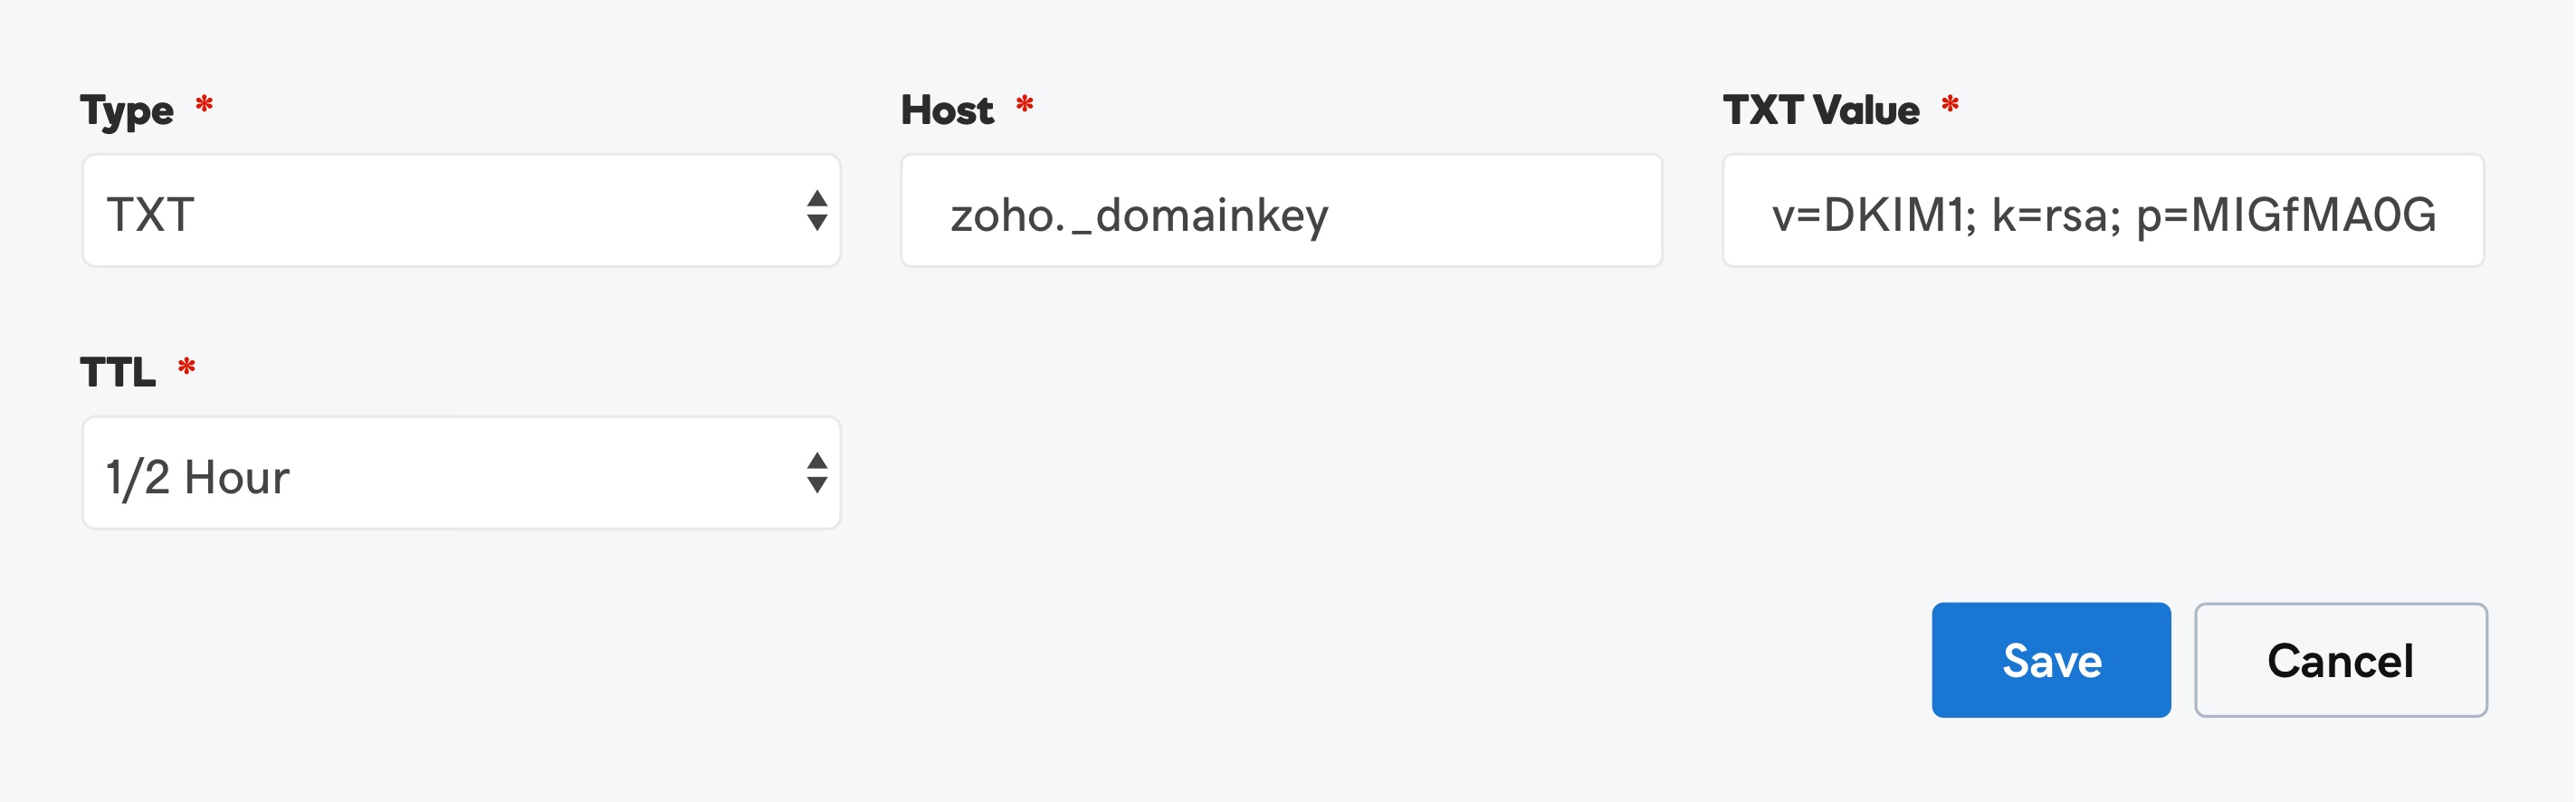
12. Find the section for creating a TXT record, then choose the Add option. This ensures the adding of DKIM records.
13. Enter the value "zoho._domainkey" for the host field. This value is specific to each domain and can be found on Zoho's Domain Settings page. Retrieve it from there and add it to your domain's DNS settings.
14. For the Points to/Value field, enter the value "v=DKIM1; k=r**; p=***************....****". This value can be found on Zoho's Domain Setup page. Retrieve it from there and add it to your domain's DNS settings. Then Click Save.
15. If the TTL is adjustable, choose the shortest duration possible to implement the changes.
After adding all the above-mentioned three records, again visit your Zoho Mail domain setup page. After that, click Verify All Records.
After verifying your MX records, it usually takes around one to two hours to start receiving emails. However, the transmission of SPF and DKIM records may require anywhere from 4 to 48 hours, depending on your Domain Registrar.
Email Migration
You can transfer your data from your current email provider to Zoho Mail using these migration techniques:
IMAP/POP Migration
G Suite Migration
Office 365 Migration
Migration from Microsoft Exchange Server
Zoho Exchange Migration Wizard
Select the appropriate migration method from the options provided above and then proceed by following the steps outlined below.
1. Click Email Migration in the Admin console.
2. Provide the server details to initiate the migration process. If you need to migrate data from your Google Workspace account, validate it before adding the Migration
3. From the drop-down menu, select the Protocol/Application.
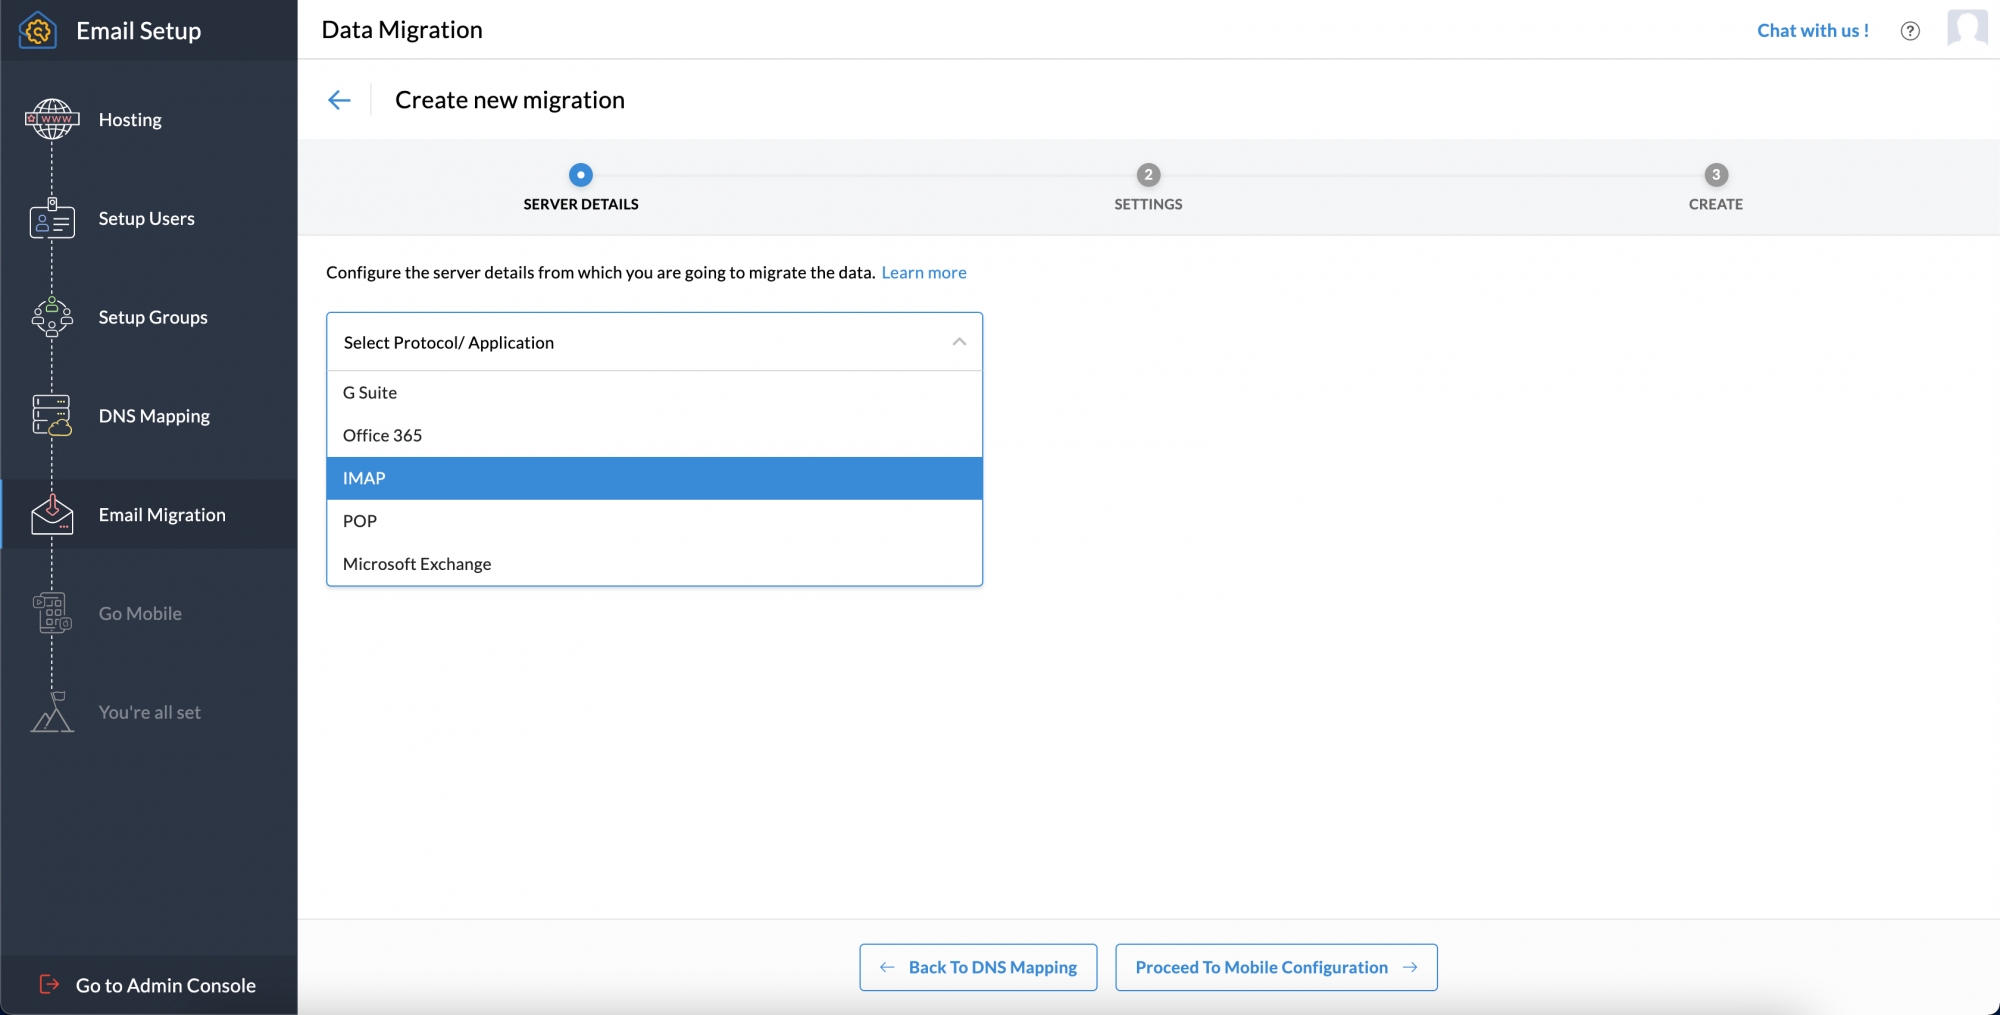
4. You have to provide the server information from which you wish to migrate the data. Once completed, click Add.

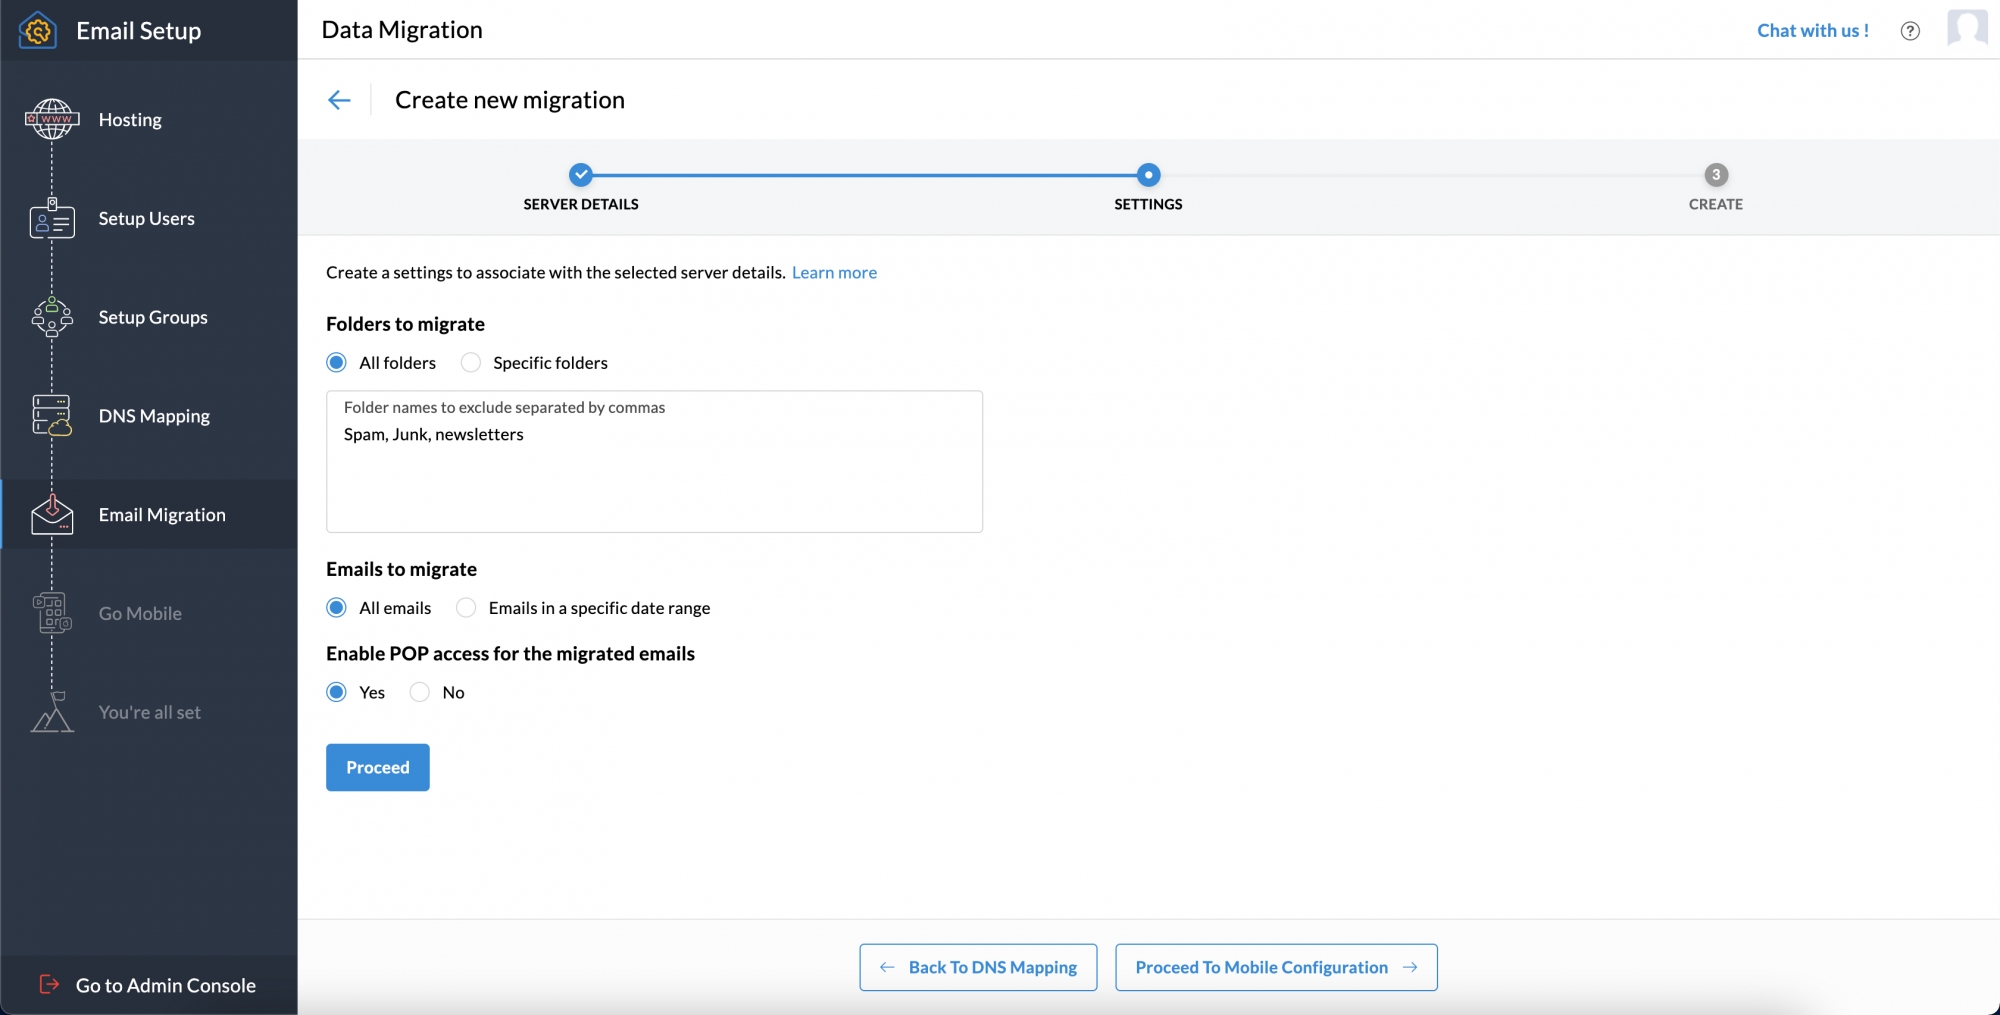
5. On the Settings page, you have to provide information related to folders to migrate, exclude, and other applicable details. After completion, click Proceed.
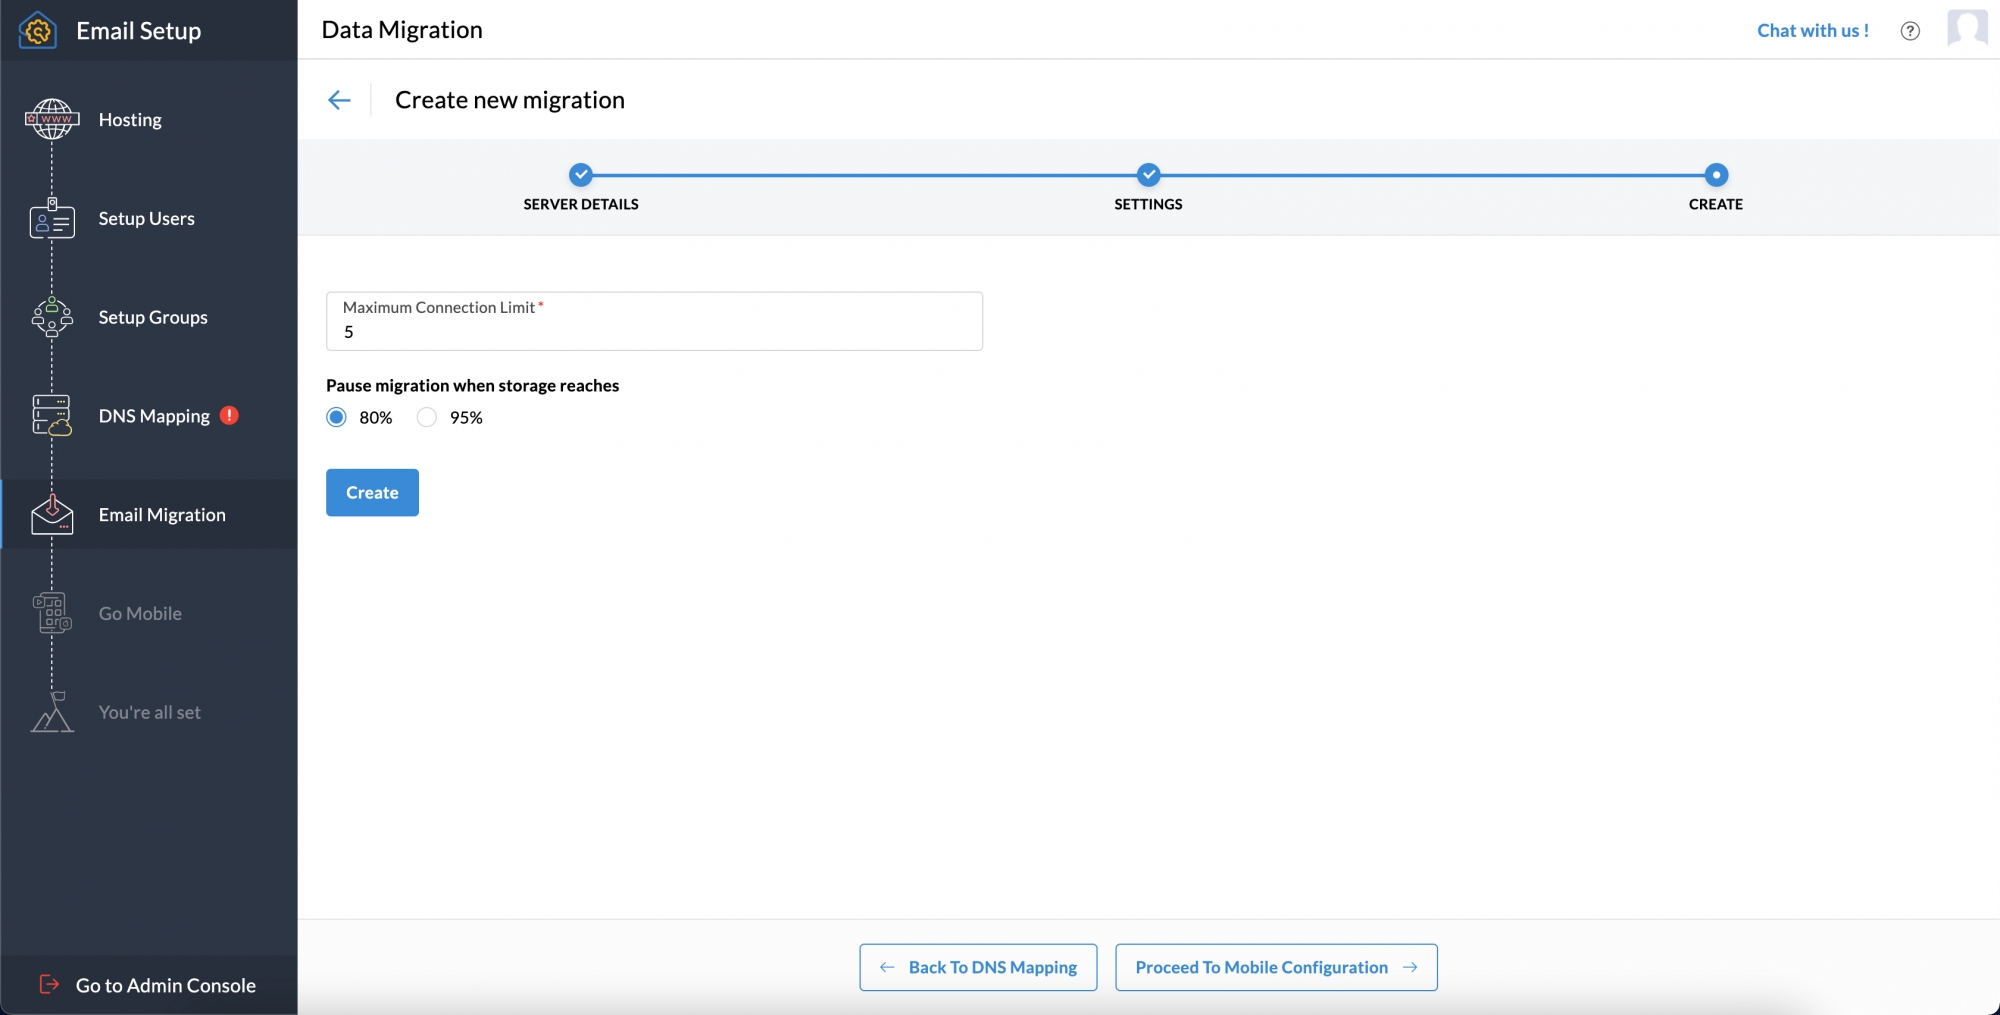
6. You can pause the migration related to storage by setting a maximum connection limit. Then click Create.
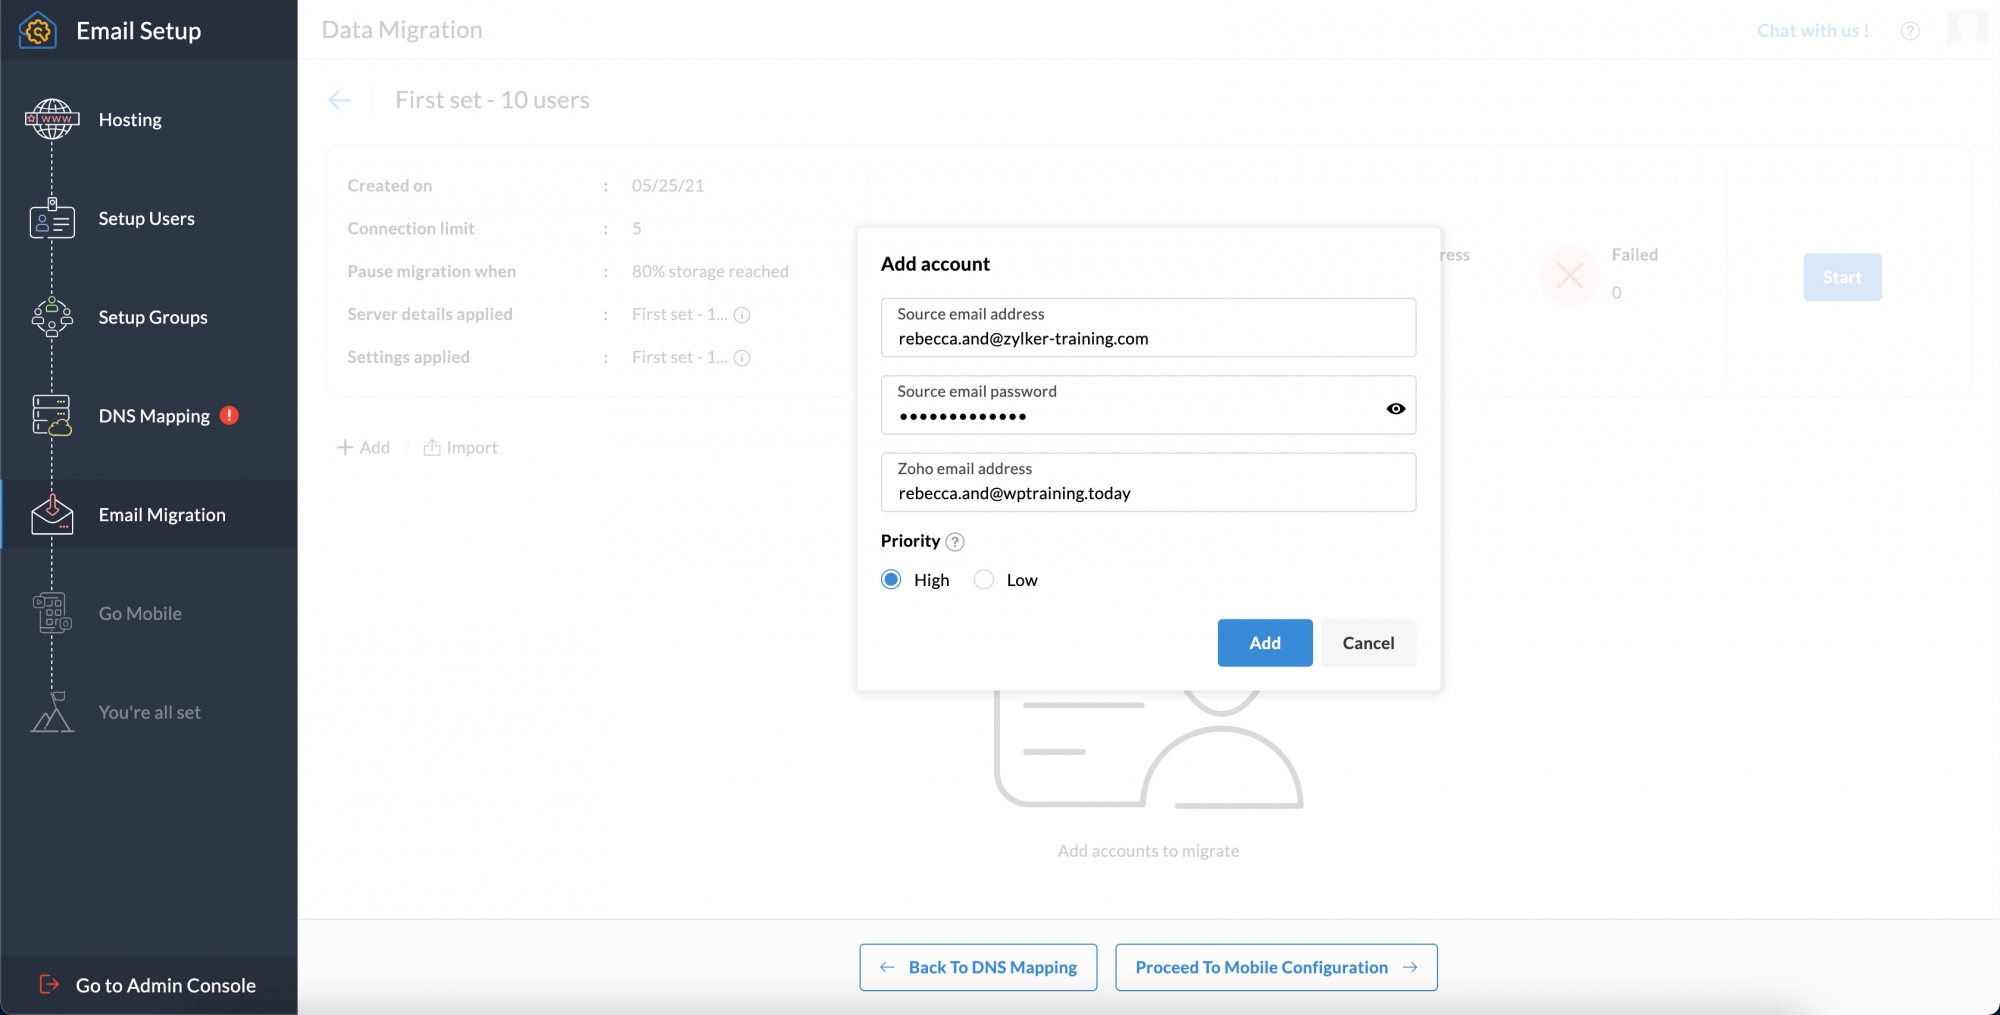
7. The next step is to add accounts individually or upload them using a CSV file. Then click Start.